Mobile Testing Tutorial/en
This tutorial describes the basic procedure for creating tests with the Mobile Testing Plugin. The basis for this is a supplied example consisting of a simple app and an expecco test suite.
The expecco Mobile Demo app calculates and checks various everyday codes: the IBAN from European payment transactions, the international GTIN 13 product codes found in retail bar codes, and the serial numbers on euro banknotes.
The test-suite contains test cases for individual functions of the app. Not all functions are covered yet, but will be added in the course of the tutorial.
There are two versions of these Tutorials:
The procedure is almost identical in both versions, only the connection configurations are created differently. The finished tests then differ essentially in the paths for addressing the elements used, since these are technology-dependent.
Inhaltsverzeichnis
First steps with Android[Bearbeiten]
It is assumed that you have already read the chapter Installation and Setup and completed the necessary preparations for using Android devices devices under Windows.
Step 1: Run Demo[Bearbeiten]
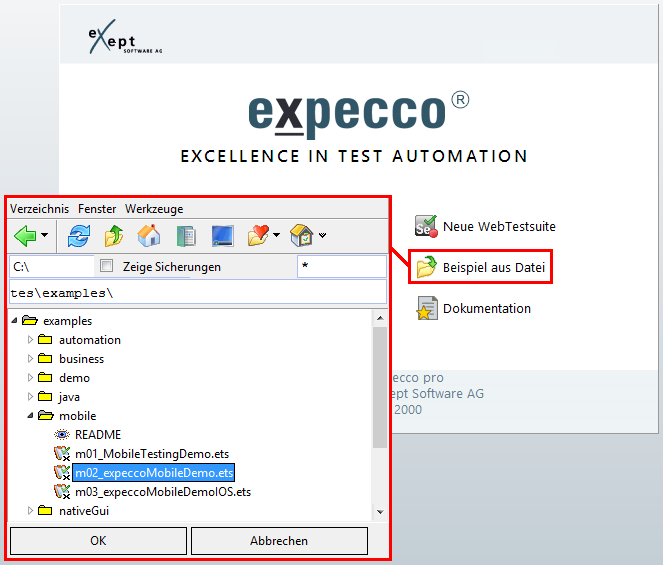
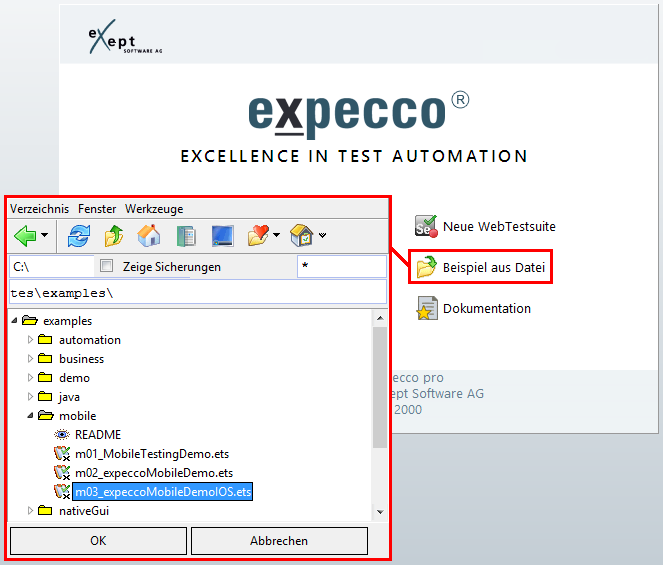
Start expecco and open the test-suite m02_expeccoMobileDemo.ets via the button Example from file (fig. 1). As of expecco 2.11 this is located in the subfolder mobile. Otherwise download the test-suite m03_expeccoMobileDemoIOS.ets to the computer where your expecco installation is located and open it. In this test-suite there is already a ready-made test plan with some test cases for this app.
In the test suite the package of the demo app is included as an attachment (expeccoMobileDemo-debug.apk). With the provided module Export Demo App you can export the file to any location on your computer. Select the device (1) and click on the green play button (2) to execute the device (fig. 2). The block opens a file dialog in which you specify where the package should be saved.
Before we get into the rest of the test-suite, first configure the connection and which device you want to use. To do this, connect a device to your computer via USB or start an emulator.
Now open the GUI browser (1) and select the entry Mobile Testing (3) under Connect (2) (Fig. 3) to open the connection dialog.
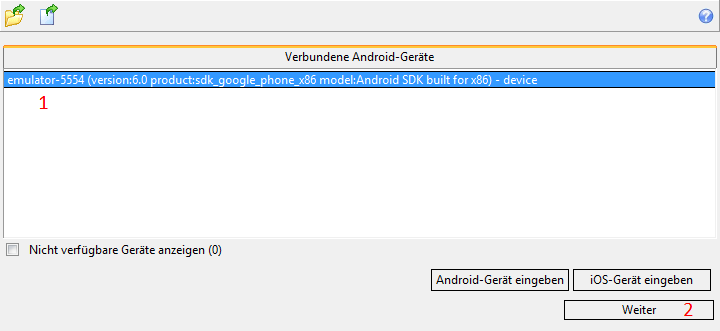
You will see a list of all connected Android devices (1) (Fig. 3). If your device does not appear in the list, make sure it is turned on and connected via USB. Otherwise read the section Prepare Android Device
Once you have found your device in the list, select it and click Next (2).
Next, specify which app you want to use (Fig. 5). You can choose if you want to start an app that is already installed on the device (App on the device) or if you want to install and start an app (Install app). In case you want to use an already installed app, you will get a list of all packages installed on the device (1), which are divided into system packages and foreign packages (2), as well as their activities (3). You can then simply select these in the respective fields.
For this tutorial the app you just exported from the test-suite should be installed. Select Install App and enter the appropriate path in App (1) (Fig. 6). You can use the button on the left (2) to open a file dialog where you can navigate to the file to enter it. The package (3) and the activity (4) of the app will be entered automatically. If the app has multiple activities, you can select the one you want. Now click on Next (5).
On the last page you can see an overview of all previous data (1) (Fig. 7). Below, you can enter a name for the connection under which it will be displayed in the GUI browser (2). In addition, a connection can be identified by this name and used in blocks; the name must therefore be unique. If you do not specify a name, one is generated generically. Enter expeccoMobileDemo as the name. Enter the address for the Appium server in the field below (3). Appium is the interface, via which the connected devices are controlled. For this tutorial expecco manages the instances of the Appium server. Enter the local default address http://localhost:4723/wd/hub. This is always the lowest entry in the proposal list. In addition the option Start if necessary is activated (4). expecco then checks if an Appium server is already running at the address and starts and ends it automatically if necessary. If the port 4723 is already occupied or if you want to use several connections at the same time, use a different port at this point. It is common to use the odd port numbers above 4723, i.e. 4725, 4727 and so on. Of course you can also use remote servers, but the automatic start and stop of a server can only be done locally by expecco.
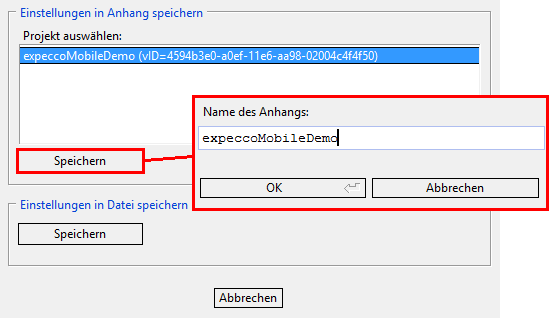
Now click on Save (5) to save the settings for the test execution. Settings can be saved as an attachment to an execution definition or to an external file (Fig. 8). If you have several projects open at the same time, you can select the project in which the attachment is to be created from the list. Click on Save in the Save settings in attachment area and enter expeccoMobileDemo as the name. Now click on Start server and connect (6) to establish a connection with the specified configuration.
It may take a while to establish the connection. Wait until the connection is established and displayed in the GUI browser. You will see that the app is started on the device. Now you know that the configuration works. The saved settings should now be used for the test, which then establishes the same connection. Select the connection in the GUI browser, right-click and select 'Close Connection' from the context menu to avoid any conflict. Then switch back to the test-suite tab.
In the test suite, the settings were created as an appendix expeccoMobileDemo (Fig 9). Select the Connect block (1) and switch to the Network view on the right (2). Drag and drop the settings into the network of the block (3). Connect the output pin pathName with the input pin stringOrFilename[1] of the block Connect from File (4). Confirm the changes with Apply (5). This block will establish the connection to the app at the beginning of the test.
Now switch to the test plan Demo Test (1) (Fig. 10). This test plan already contains some finished test cases. Before and after the execution (2) one block is also entered: The just edited block Connect for the setup and the block Disconnect for the disconnection. By entering the two blocks at this point, the connection is terminated, especially if the test is aborted prematurely, e.g. because one of the test cases fails.
Now you can start the test plan Demo Test by clicking on the green Play button (3). The test plan should run without errors.
Step 2: Creating a Block with the Recorder[Bearbeiten]
With the help of the integrated recorder, you can easily record execution sequences and store them in a block. This requires a connection to a test device, which is used to create the test.
To establish a connection, switch back to the GUI browser. The connection that you created previously is still entered here. Since the same name was used for the connection in the test run, the settings were overwritten (in our case, the settings were identical anyway). The connection is currently not active, since it was terminated at the end of the execution. However, the settings are still entered there. To reestablish the connection with this configuration, select it, right-click it, and then Connect.
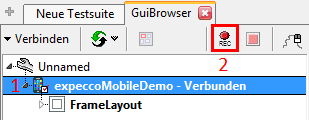
Wait until the connection is established (1), then press the record button (2) to start recording (Fig. 11).
A window opens with the Mobile Testing Recorder (Fig. 12). This shows a screenshot of the connected device. This screen allows you to control the device remotely. Every action you perform is recorded in the background.
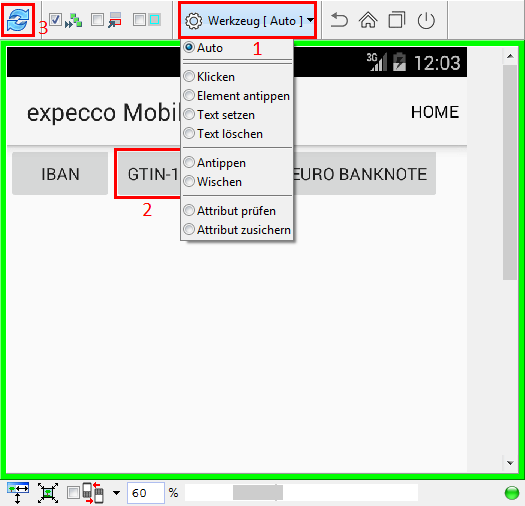
In the upper menu bar you can select the tool (1) with which you want to enter an action. The Auto tool is selected by default. You can use it to record certain actions by making gestures on the display with the mouse pointer. For example, if you left-click for a long time, this corresponds to a long tap on the element at this point. Instead of specifying the desired action with the corresponding gesture, you can also select it manually.
A new test for the recognition of correct GTIN-13 codes should now be recorded. First click briefly on the button GTIN-13 (EAN-13) (2) of the app in the display to trigger a corresponding click on the device. During the execution of this action, the frame of the recorder will briefly turn red. If the recorder does not display the current view of the app afterwards, click on the update icon (3) in the recorder.
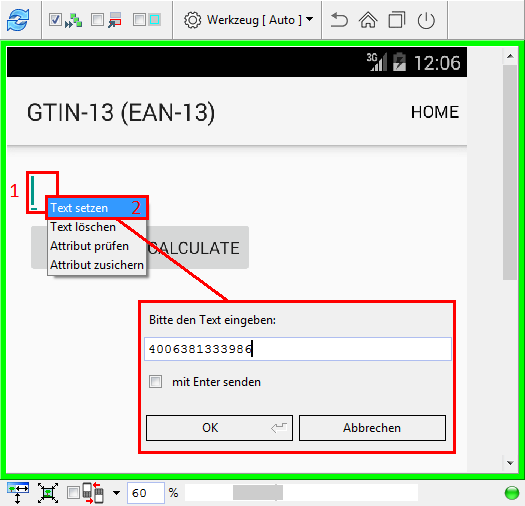
Then enter a correct GTIN-13 in the input field of the new page. To do this, right-click on the input field (1) and select the action Set text (2) in the context menu (Fig. 13). Enter any valid article number in GTIN-13 format, e.g. 4006381333986 (3). This text is now set in the app.
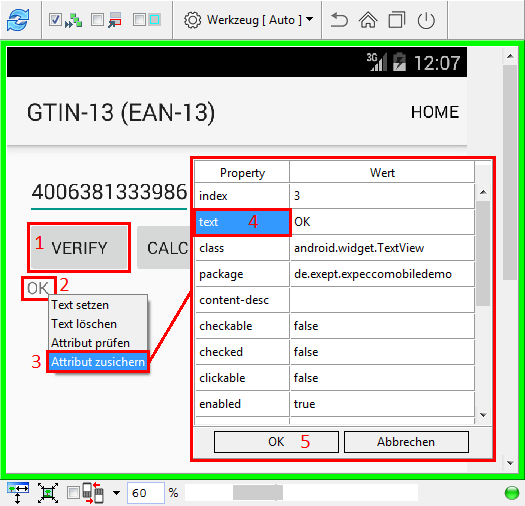
Now click on Verify (1) (Fig. 14). The app now displays OK (2) as the result. The test should determine whether this result is actually displayed. After a right click you can select the action Assure attribute (3) in the context menu. In the dialog that opens, select the property text (4) and confirm with OK (5). This time, no action is triggered on the device, but only a block is recorded that fails if the result deviates from the expected value OK.
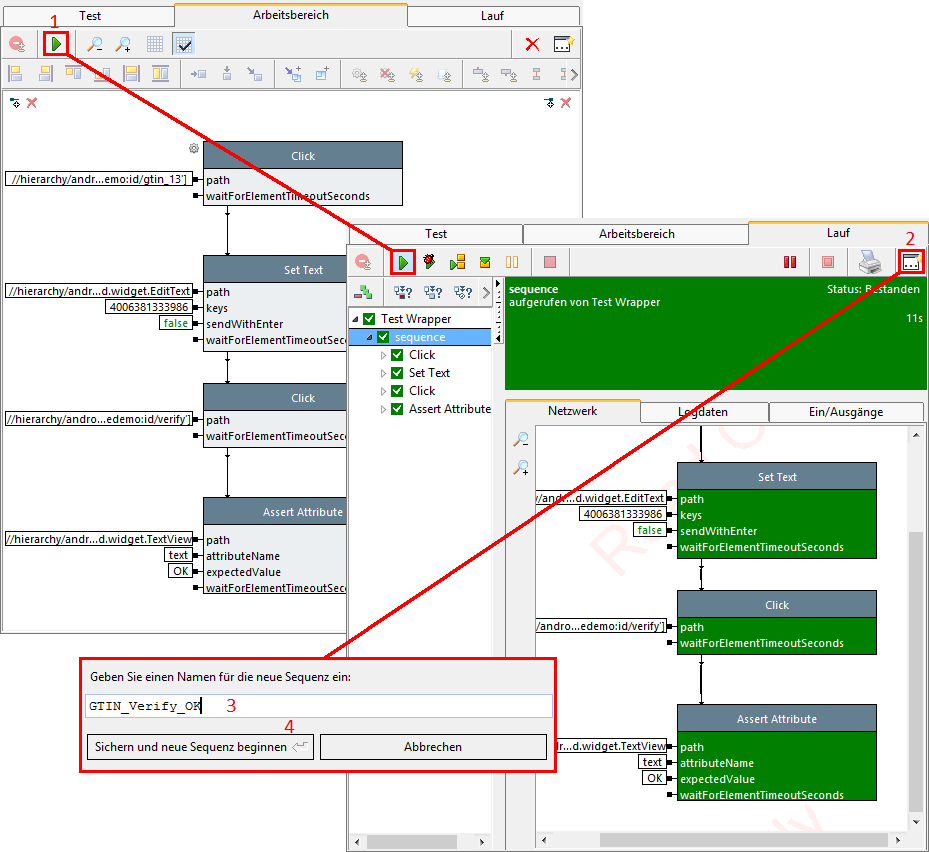
Now close the recorder. In the workspace of the GUI browser you can see that a block has been created for each of the recorded actions (Fig. 15). You can now test whether the recorded action can be played back. To do this, you must first return the app on your device to its initial state by using the HOME button on the top right of the device. Then click in expecco on the green Play button (1). If everything turns green, the execution was successful. Now create a new block in the test-suite by clicking on the block symbol (2) in the upper right corner. Give it the name GTIN_Verify_OK (3) and confirm (4).
Now close the connection by selecting the connection, right-clicking and selecting Close connection from the context menu.
Switch back to the Testsuite tab. The new block was created there. Again select the test plan Demo-Test and add the recorded test case GTIN_Verify_OK by drag-and-drop at the end of the test plan. Apply the change and restart. The test plan should run again without errors.
Step 3: Customizing XPath Using the GUI Browser[Bearbeiten]
Your new device may not work on other devices. The elements used are addressed via an XPath and this cannot be correct on other devices. See the Customizing XPath Using the GUI-Browser section for more information. If you have another device available, you can now try to generalize the paths in your created devices. You can also skip this step.
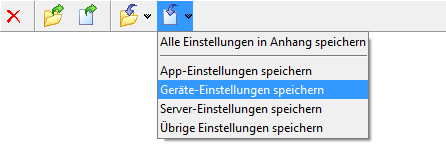
If you find it difficult to find shortened paths, follow the paths of the existing blocks. Start the test again. If the test now fails, check the paths again in the GUI browser. To run the test on a second device, open in the menu Extensions > Mobile Testing > Create connection settings. You will get a dialog similar to the connection dialog. However, you can only create and save settings but not establish a connection. However, you have the option to save individual aspects of the settings, such as only the device. Select the new device and click on the Save icon in the attachment until the delayed menu opens (Fig. 16). Select Save device settings here. It is best to name the attachment after the device. You can then close the dialog again.
Select the Connect block and drag the settings for the new device into its network. Now connect its output pin pathName with the input pin stringOrFilename[2] of the block Connect from File. The block Connect from File reads the information at the input pins from top to bottom, multiple properties are replaced. In this case, the settings for the device used are replaced, while the other settings remain the same. If you have chosen the paths skilfully, the test will now also run successfully on the other device.
Step 4: Create another block[Bearbeiten]
If the same procedures are repeated in the test, you can reuse or modify blocks that have already been created for this purpose. The block created in step 2 checks the recognition of correct GTIN 13 codes. A test is still missing which, conversely, checks the detection of a wrong GTIN-13 code. The structure of the two tests is identical, they only differ in their parameters. Therefore, copy the block GTIN_Verify_OK and rename the copy to GTIN_Verify_NOT_OK. Change the input of the GTIN-13 to a wrong code, for example by changing the last digit (4006381333987) and set the check value of the output to NOT OK (Fig. 17).
Add this new test to the Test Plan Demo Test as well and place it at the end. Run the test plan, but don't forget to disconnect in the GUI browser first.
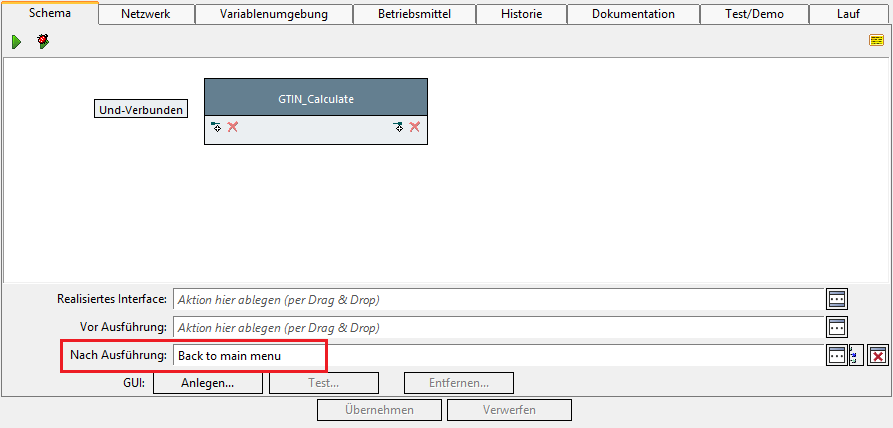
The new test will fail because the device you added does not return to the start page of the app, but the tests start from there. This is already considered in the other blocks; they always execute the block Back to main menu at the end. You can see this by selecting one of the other blocks, e.g. GTIN_Calculate, and switching to its schematic view. There the block Back to main menu is displayed in the field After execution (Fig. 18). As with the corresponding field in the test plan, this block is always executed at the end, regardless of whether the test is successful or aborted. Now add this entry to your blocks GTIN_Verify_OK and GTIN_Verify_NOT_OK. Select the block and drag the block Back to main menu in the schema view to the input field After execution. Now you can start the test plan and all tests should be executed again without any problems.
Step 5: Complete Test[Bearbeiten]
For the Activity IBAN all answer possibilities of the app are already covered with test cases. In the GTIN-13-Activity a correct and a faulty code are tested and a check digit is calculated, but the behaviour of the app in case of input of wrong length is not tested yet (With Verify 'Input must be exactly 13 digits. and ...12 digits. for Calculate). The activity for checking the serial numbers of euro banknotes is not yet tested. As with the IBAN, three cases can occur here: a correct serial number was entered (answer: OK), an incorrect serial number was entered (answer: NOT OK) or the specification does not correspond to the format (answer: A serial number consists of 12 characters with the first one or two being capital letters (A-Z).). You can now extend the test coverage by creating test cases. You can create the blocks for this with the recorder as in step 2 and generalize the XPaths if necessary. If you are familiar with the basic handling of expecco, you can of course also create blocks without recorder by manually assembling them from existing blocks of the library. You can also combine both approaches as you wish.
Note that the test cases presented here only check individual entries. If you write test cases for your own apps, you will probably want to test more closely by entering more different values, including edge cases.
First steps with iOS[Bearbeiten]
It is assumed that you have already read the chapter Installation and Setup and completed the necessary preparations for using iOS devices under Mac OS. Connect the device you want to use to your Mac. Download the iOS version of the expeccoMobileDemo-App to your Mac. Since the app is a debug build, you still need to sign it for your device (see Preparing an iOS-Device and App). Now start an Appium server on your Mac.
Step 1: Run Demo[Bearbeiten]
Start expecco and open the test-suite m03_expeccoMobileDemoIOS.ets via the button Example from file (Fig. 1). As of expecco 2.11 this is located in the subfolder mobile. Otherwise download the test-suite m03_expeccoMobileDemoIOS.ets to the computer on which your expecco installation is located and open it. In this test-suite there is already a ready-made test plan with some test cases for this app.
Before we get into the rest of the test-suite, first configure the connection and which device you want to use. Now open the GUI browser (1) and select the entry Mobile Testing (3) under Connect (2) (Fig. 2) to open the connection dialog.
Here you can enter an iOS device only by hand. Select Enter iOS device (Fig. 3). The name and iOS version of the device can be found in its properties. To find out the device ID of the device, open the Devices (Command-Shift-2) window in Xcode on the Mac. All connected devices and the available simulators are displayed there. Here you can also see the device ID (udid) of your device and which apps have been installed. After you have entered the device in the connection editor, select it in the list and click Next.
Next, specify which app you want to use. You can choose whether you want to start an app that is already installed on the device (App on the device) or if you want to install and start an app (Install app). In case you want to use an already installed app, you have to specify its bundle ID. You will also find this in the Devices window of Xcode. For the demo app it is de.exept.expeccoMobileDemo.
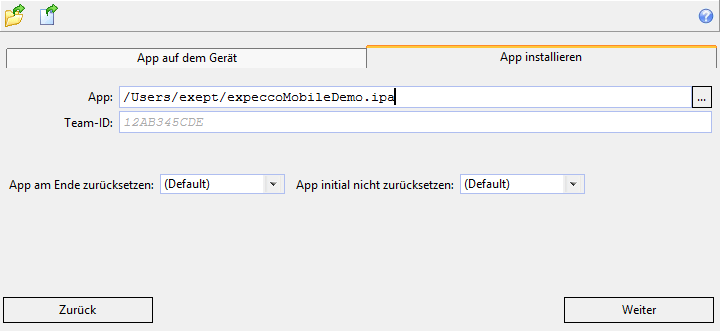
For this tutorial the demo app has to be installed first. Select Install App and enter the path to the file on your Mac (fig. 4). If you are using expecco 2.11, you can also specify the Team-ID on this page, which specifies which certificate should be used for iOS connections. If you have already specified an ID in Plugin Settings, it will be used. It will be grayed out unless you specify another value. Now click on Next.
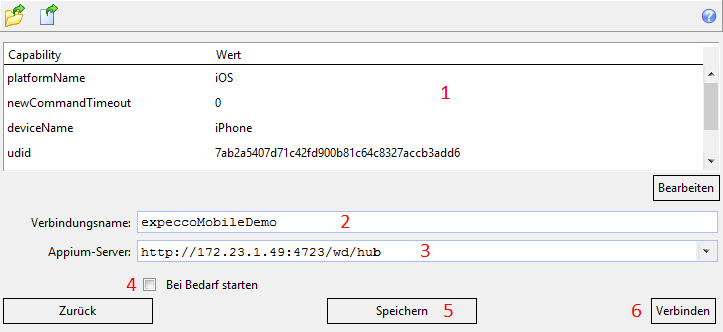
On the last page you can see an overview of all previous data (1) (Fig. 5). Below the Capabilities list, you can enter a name for the connection under which it is displayed in the GUI browser (2). In addition, a connection can be identified by this name and used in blocks; the name must therefore be unique. If you do not specify a name, one is generated generically. Enter expeccoMobileDemo as the name. Enter the address for the Appium server in the field below (3). If you have started the Appium server with default settings, you only have to replace localhost in the default address (lowest entry of the suggestion list) with the IP address of the Mac (in the picture 172.23.1.49). To make sure which port the Appium server is listening on, see its output. At the beginning there is the line
info: Appium REST http interface listener started on 0.0.0.0:4723
If the default port 4723 does not appear at the end, change this value accordingly in the configuration.
If the option Start on demand (4) is activated, expecco checks if an Appium server is already running at the address and starts and stops it automatically if necessary. However, this is only possible for local server addresses, so deactivate this option.
Now click on Save (5) to save the settings for the test execution. Settings can be saved as an attachment to an execution definition or to an external file (Fig. 6). If you have several projects open at the same time, you can select the project in which the attachment is to be created from the list. Click on Save in the Save settings in attachment area and enter expeccoMobileDemo as the name. Now click on Connect (6) to establish a connection with the specified configuration.
It may take a while to establish the connection. If you have entered the correct server address, you should see the connection attempt in the Appium server output. The app should be started on your iOS device. If nothing happens on the device, either the device or the app may not be found. If Appium tries to start the app and this fails, the app is probably signed incorrectly. In this case, uninstall the app so that it can be reinstalled with a new signature.
Wait until the connection is established and displayed in the GUI browser. Now you know that the configuration works. The saved settings should now be used for the test, which then establishes the same connection. Select the connection in the GUI browser, right-click and select 'Close Connection' from the context menu to avoid any conflict. Then switch back to the test-suite tab.
In the test suite, the settings were created as an appendix expeccoMobileDemo (Fig 7). Select the Connect block (1) and switch to the Network view on the right (2). Drag and drop the settings into the network of the block (3). Connect the output pin pathName with the input pin stringOrFilename[1] of the block Connect from File (4). Confirm the changes with Apply (5). This block will establish the connection to the app at the beginning of the test.
Now switch to the test plan Demo Test (1) (Fig. 8). This test plan already contains some finished test cases. Before and after the execution (2) one block is also entered: The just edited block Connect for the setup and the block Disconnect for the disconnection. By entering the two blocks at this point, the connection is terminated, especially if the test is aborted prematurely, e.g. because one of the test cases fails.
Now you can start the test plan Demo Test by clicking on the green Play button (3). The test plan should run without errors.
Step 2: Creating a block with the Recorder[Bearbeiten]
With the help of the integrated recorder, you can easily record execution sequences and store them in a block. This requires a connection to a test device, which is used to create the test.
To establish a connection, switch back to the GUI browser. The connection that you created previously is still entered in this browser. Since the same name was used for the connection in the test run, the settings were overwritten with it (in our case, the settings were identical anyway). The connection is currently not active, since it was terminated at the end of the execution. However, the settings are still entered there. To reestablish the connection with this configuration, select it, right-click it, and then Connect.
Wait until the connection is established (1) and then press the record button (2) to start recording (Fig. 9).
A window opens with the Mobile Testing Recorder (Fig. 10). This shows a screenshot of the connected device. This screen allows you to control the device remotely. Every action you perform is recorded in the background.
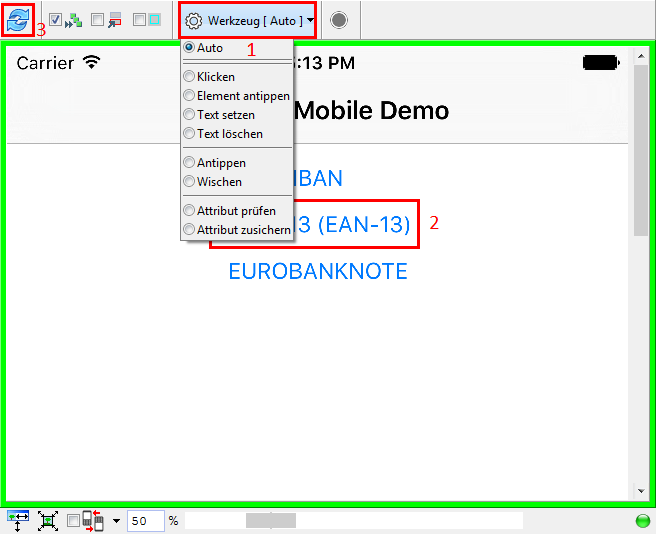
In the upper menu bar, you can select the tool (1) with which you want to enter an action. The tool Auto is selected by default. You can use it to record certain actions by making gestures on the display with the mouse pointer. For example, if you left-click for a long time, this corresponds to a long tap on the element at this point. Instead of specifying the desired action with the corresponding gesture, you can also select it manually.
Now a new test for the recognition of correct GTIN-13 codes shall be recorded. First click briefly on the button GTIN-13 (EAN-13) (2) of the app in the display to trigger a corresponding click on the device. During the execution of this action, the frame of the recorder will briefly turn red. If the recorder does not display the current view of the app afterwards, click on the update icon (3) in the recorder.
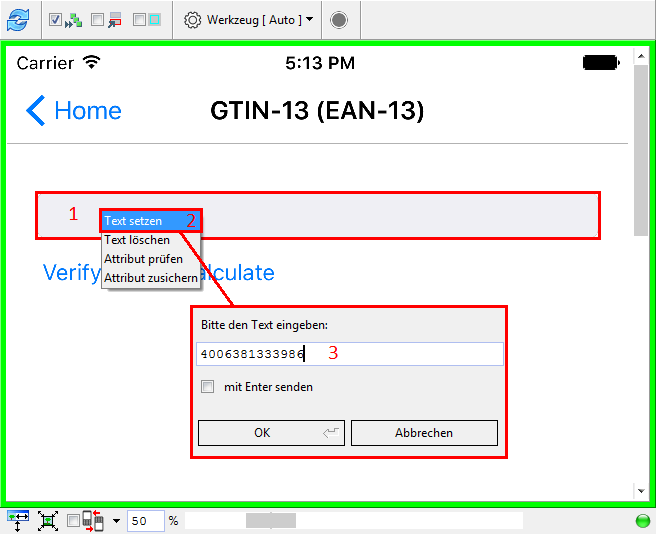
Then enter a correct GTIN-13 in the input field of the new page. To do this, right-click on the input field (1) and select the action Set text (2) in the context menu (Fig. 11). Enter any valid article number in GTIN-13 format, e.g. 4006381333986 (3). This text is now set in the app.
Now click on Verify (1) (Fig. 12). The app now displays OK (2) as the result. The test should determine whether this result is actually displayed. After a right click you can select the action Assure attribute (3) in the context menu. In the dialog that opens, select the property value (4) and confirm with OK (5). This time, no action is triggered on the device, but only a block is recorded that fails if the result deviates from the expected value OK.
Now close the recorder. In the workspace of the GUI browser you can see that a block has been created for each of the recorded actions (Fig. 13). You can now test whether the recorded action can be played back. To do this, you must first return the app on your device to its initial state by using the Home button on the top left of the device. Then click in expecco on the green Play button (1). If everything turns green, the execution was successful. Now create a new block in the test-suite by clicking on the block symbol (2) in the upper right corner. Give it the name GTIN_Verify_OK (3) and confirm (4).
Now close the connection by selecting the connection, right-clicking and selecting Close connection from the context menu.
Switch back to the Testsuite tab. The new module was created there. Again select the test plan Demo-Test and add the recorded test case GTIN_Verify_OK by drag-and-drop at the end of the test plan. Apply the change and restart. The test plan should run again without errors.
Step 3: Customizing XPath Using the GUI Browser[Bearbeiten]
Your new device may not work on other devices. The elements used are addressed via an XPath and this cannot be correct on other devices. See the Customizing XPath using the GUI Browser section for more information. If you have another device available, you can now try to generalize the paths in your created devices. You can also skip this step.
If you find it difficult to find shortened paths, follow the paths of the existing blocks. Start the test again. If the test now fails, check the paths again in the GUI browser. To run the test on a second device, open in the menu Extensions > Mobile Testing > Create connection settings. You will get a dialog similar to the connection dialog. However, you can only create and save settings but not establish a connection. However, you have the option to save individual aspects of the settings, such as only the device. Enter the new device and select it. Click longer on the symbol for saving in the attachment until the delayed menu opens and select Save device settings here (Fig. 14). It is best to name the attachment after the device. You can then close the dialog again.
Select the Connect block and drag the settings for the new device into its network. Now connect its output pin pathName with the input pin stringOrFilename[2] of the block Connect from File. The block Connect from File reads the information at the input pins from top to bottom, multiple properties are replaced. In this case, the settings for the device used are replaced, while the other settings remain the same. If you have chosen the paths skilfully, the test will now also run successfully on the other device.
Step 4: Create another block[Bearbeiten]
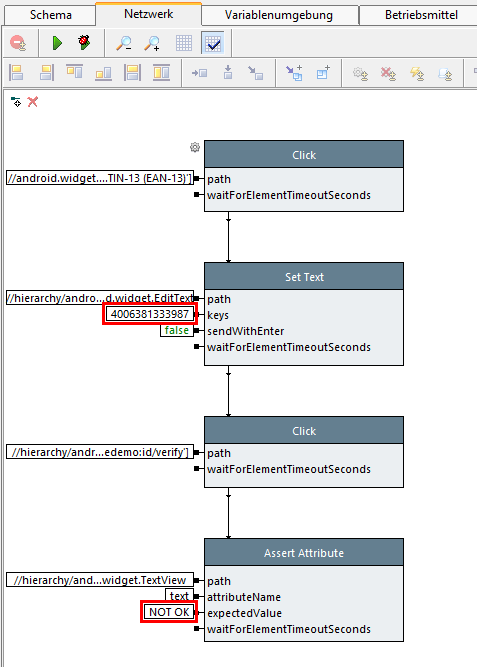
If the same procedures are repeated in the test, you can reuse or modify modules that have already been created for this purpose. The block created in step 2 checks the recognition of correct GTIN 13 codes. A test is still missing which, conversely, checks the detection of a wrong GTIN-13 code. The structure of the two tests is identical, they only differ in their parameters. Therefore copy the block GTIN_Verify_OK and rename the copy to GTIN_Verify_NOT_OK. Change the input of the GTIN-13 to a wrong code, for example by changing the last digit (4006381333987) and set the check value of the output to NOT OK (Fig. 15).
Add this new test to the Test Plan Demo Test as well and place it at the end. Run the test plan, but don't forget to disconnect in the GUI browser first.
The new test will fail because the device you added does not return to the start page of the app, but the tests start from there. This is already considered in the other blocks; they always execute the block Back to main menu at the end. You can see this by selecting one of the other blocks, e.g. GTIN_Calculate, and switching to its schematic view. There the block Back to main menu is displayed in the field After execution (Fig. 16). As with the corresponding field in the test plan, this block is always executed at the end, regardless of whether the test is successful or aborted. Now add this entry to your blocks GTIN_Verify_OK and GTIN_Verify_NOT_OK. Select the block and drag the block Back to main menu in the schema view to the input field After execution. Now you can start the test plan and all tests should be executed again without any problems.
Step 5: Complete test[Bearbeiten]
For the Activity IBAN all answer possibilities of the app are already covered with test cases. In the GTIN-13-Activity a correct and a faulty code are tested and a check digit is calculated, but the behaviour of the app in case of input of wrong length is not tested yet (With Verify 'Input must be exactly 13 digits. and ...12 digits. for Calculate). The activity for checking the serial numbers of euro banknotes is not yet tested. As with the IBAN, three cases can occur here: a correct serial number was entered (answer: OK), an incorrect serial number was entered (answer: NOT OK) or the specification does not correspond to the format (answer: A serial number consists of 12 characters with the first one or two being capital letters (A-Z).). You can now extend the test coverage by creating test cases. You can create the blocks for this with the recorder as in step 2 and generalize the XPaths if necessary. If you are familiar with the basic handling of expecco, you can of course also create blocks without recorder by manually assembling them from existing blocks of the library. You can also combine both approaches as you wish.
Note that the test cases presented here only check individual entries. If you write test cases for your own apps, you probably want to test more closely by entering more different values, including edge cases.
