Manual Test Tutorial/en
Deutsche Version | English Version
Inhaltsverzeichnis
- 1 Manual Tests
- 2 The Manual Test Wizard
- 3 Remote Wizard Control
- 4 Manual Test Action Library
- 5 Manual Test Example (Step by Step Tutorial)
- 5.1 Step 1: Create a New Test Suite
- 5.2 Step 2: Create a Test Case
- 5.3 Step 3: Create a Test Step for a Test Case
- 5.4 Step 4: Define What is to be Shown in the Wizard
- 5.5 Step 5: Execute the Test Case in Isolation and Verify the Wizard's Presentation
- 5.6 Step 6: Creation of a Test Plan, Automatic Open/Close of the Wizard
- 6 More Examples
Manual Tests[Bearbeiten]
At first sight, it may seem strange to cover manual tests in the context of "automation". However, there are many situations in which manual operations are required - even in an automated test. For example: power on a device, readout of measured values, visual inspection etc.
In addition, expecco helps you to migrate: if you are already performing manual tests, and you can provide machine readable requirements- or test specifications, then expecco can import those and run them as manual tests.
Although still executed manually, this will give you better reports and - probably even more of significance - the guaranty that the steps where executed properly.
You can also migrate incrementally from fully manual tests, via partially automated tests to fully automated tests, by starting with manual test steps and replacing them with automated actions one by one.
Even these partial automated tests will save time and money, as repeated actions (like filling out forms , confirming dialogs or reading measurement values) run much faster when automated and thereby reduce the overall execution time.
If you are impatient, skip right to the "Step-by-Step Tutorial" further down, and return to the details later.
Combining Manual Test Steps with Automated Steps[Bearbeiten]
You can arbitrarily combine manual steps with any other action step inside a diagram or test. For example, a manual step might ask the user to turn on power, to plug a cable, to perform a visual inspection or to perform any other operation involving human interaction.
Also, partial checks which are not (yet) automated can be included this way. If you put these into separate wrapper actions, these can later be replaced by automated ones, without a need to change other parts of your suite.
Especially remember that such actions can be placed into a separate imported expecco action library, so that later, only a simple reimport operation is required to switch to the automated version.
The Manual Test Wizard[Bearbeiten]
If any manual test step is executed by expecco, a dialog window (the so called Manual Test Wizard) is opened, which guides the user and provides hints about the test to be performed.
The tester will be guided in a step-by-step fashion by the wizard, who can add comments, data or screenshot as documentary of the test run, and confirm each step as successful (possibly with additional notes), as failed or as inconclusive. The íncionclusive outcome means that the test step could not be performed (for example because a device was offline), and therefore, no statement about the proper operation of the tests system could be made. Such tests have to be repeated later.
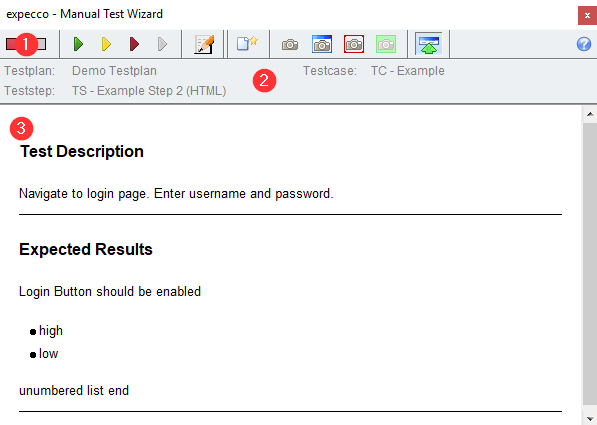
The wizard's user interface consists of 3 main areas:
- Toolbar area
- general informationen on the current step
- Orders on what do do in the current test step
The Toolbar[Bearbeiten]
The toolbar provides functions to set the outcome of the current step, to add comments and to attach data files or screenshots to the report.
Of special relevance are the "Next" buttons (triangular right arrows); these confirm the current step and mark it as "Successful" (green), "Failed" (red) or "Inconclusive" (gray). The yellow button also stands for "Success", but asks for a comment to be added as warning to the final report and log file.
The other buttons are used to attach files or screenshots.
Information on the Current Step[Bearbeiten]
This area shows the current step's name, the test case, of which it is part of, and the test plan which is currently running. Some of this depends on whether the action is executed as part of a test plan, or as a single-action run (in the "Test/Demo" tab of the editor). This needs proper tagging of your blocks as TEST-CASE and TEST-STEP to work (see next section).
Test Step vs. Test Case[Bearbeiten]
Whether an action is displayed in the tree as TEST-CASE or TEST-STEP depends on corresponding tags of the action. Although this has no semantic meaning w.r.t. the execution of actions, it is useful to organize and structure the suite into layers.
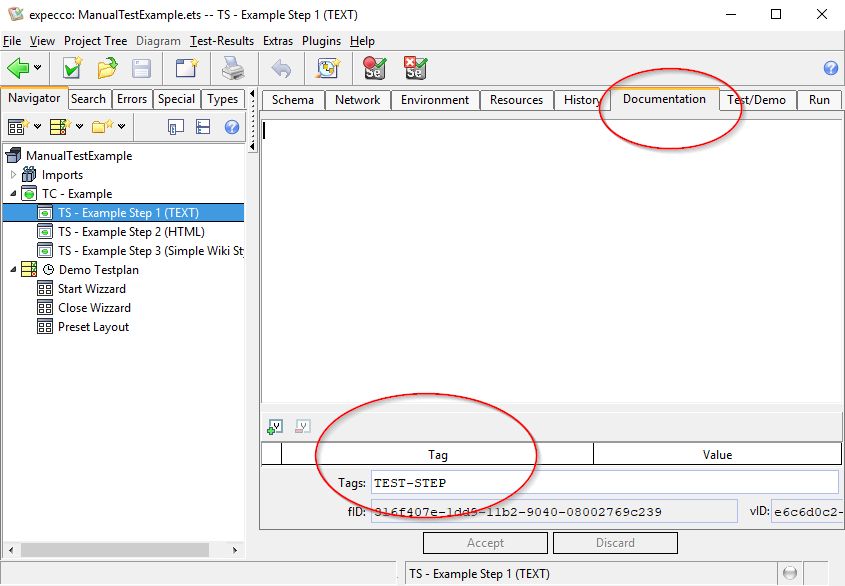
Test actions are identified by having a tag named TEST-CASE or TEST_CASE. Either of them should be present in tags found in the documentation area of the test case's action definition. If you create such action via the toolbar above the project tree, these tags will be automatically set. But you can change these tags any time later if required.
Test steps are marked with a TEST-STEP tag. Likewise, this is to be found in the documentation editor at the bottom. This tag is also automatically applied if the step is created via the toolbar.
Actions marked as TEST-CASE- or TEST-STEP-Tags are shown with special icons in the tree. This is for them to be easier to find and to be somewhat standing out of other actions (but as already mentioned: has no other semantic meaning).
Orders on What to Do in Test Step[Bearbeiten]
The wizard's lower area present the test step's description.
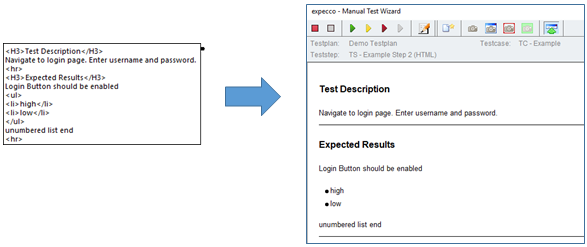
Depending on how the test step was defined, this can be presented as simple plain text, or in a more appealing HTML presentation. See more on this in the documentation on the Manual TestStep API below.
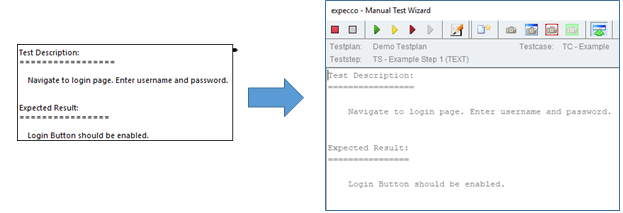
Simple Plaintext Presentation:
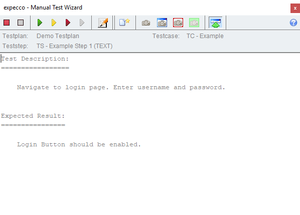
Automatic Close when no longer Needed[Bearbeiten]
By default, the wizard remains open when a manual test step finishes, and waits for the next manual test step to be executed.
If the "Automatic Close UI when no longer needed" checkbox in the project's execution settings is set, the wizard will stay open for a short time, and close itself if no manual test step is executed within that time. However it will reopen itself if such a step is executed any time later.
Find the setting by selecting the project (the top item in the left tree), and switch to the "Execution" tab. The check toggle is found in the "User Interface" section.
This flag settings affects both the manual test wizard window and the "Control & Monitor" window (which shows the UI of GUI-actions). The standard library also contains an action block to set the automatic close timeout programatically.
Programmatic Close[Bearbeiten]
The imported library contains an action to programmatically close the manual test wizard.
Remote Wizard Control[Bearbeiten]
The wizard can be configured to present its UI either locally (in the Wizard Window), or on a remote screen, This can be an Android or IOS device or a WebBrowser.
Exept provides apps to be installed in Android or IOS devices. If your device is locked or there are other reasons for not being able to install an APP, you can also use the device's regular webBrowser (Safari, Samsung, Firefox or Chrome) and get the UI presented there.
If course, it is also possible to access the UI from any other system via a webBrowser.
Expecco Remote APP for Mobile Devices[Bearbeiten]
The APPs for Android and IOS behave the same and present the same user interface. The differences are in the deployment/installation.
- enable remote UI access via the expecco settings ("Extras" → "WebServices" → "Remote REST Service")
- add a portNr (you'd typically use 80 or 8080, unless those ports are already in use by another HTTP service; we typically use 9090)
- for security, you may also set a pairing passwort to prevent unauthorized access
- if your company allows SSDP, enable it in the expecco networking settings (expecco will then send out plug&play information messages, which are received by the mobile device).
- be aware, that SSDP packets are multicast pakets, which are often blocked by switches, routers or company regulations, to prevent flooding the network.
- if no SSDP is active, remember the IP-address or hostname (shown in the setup dialog)
- on the mobile device open the app. A connect dialog will appear asking for the partner system, which should be remote controlled.
- if SSDP is active, the partner expecco system should appear in a drop-down list.
- otherwise enter the remembered IP or hostname
- press "Connect"
- if a pairing password was defined, enter this password in the popup dialog
- choose one of the running testplans, select an action which is showing the "Input-needed" icon .
- the corresponding UI will show up.
- as with the regular wizard, use the "OK", "Warn", "Fail" or "Inconclusive" buttons.
- if more manual test steps follow, the next UI will automatically appear.
Installing the Expecco Remote APP on Android[Bearbeiten]
---- to be documented ----
Installing the Expecco Remote APP on IOS (i.e. iPhone/iPad)[Bearbeiten]
---- to be documented ----
Expecco Remote in a WebBrowser[Bearbeiten]
- enable remote UI access via the expecco settings ("Extras" → "WebServices" → "Remote REST Service")
- add a portNr (you'd typically use 80 or 8080, unless those ports are already in use by another HTTP service; we typically use 9090)
- for security, you may also set a pairing passwort to prevent unauthorized access
- remember the IP-address or hostname (shown in the setup dialog)
- on the remote device (or the remote system) open a webBrowser and navigate to "http://<hostname>:<portNr>/remote".
- if a pairing password was defined, enter this password in the popup dialog
- choose one of the running testplans, select an action which is showing the "Input-needed" icon .
- the corresponding UI will show up.
- as with the regular wizard, use the "OK", "Warn", "Fail" or "Inconclusive" buttons.
- if more manual test steps follow, the next UI will automatically appear.
Expecco Remote Protocol[Bearbeiten]
Expecco remote is implemented on top of a REST protocol. Thus custom applications can easily be built to integrate remote access into any third party application, if so desired.
Manual Test Action Library[Bearbeiten]
Manual test sequences are usually created by placing individual test steps via drag&drop from the Manual Test Library into a diagram.
In this library you'll find the 3 most important actions to execute manual test steps, in addition to support actions eg. to open/close the wizard etc).
Usually you will not need those, as the wizard opens automatically when the first manual test step is executed. However, they are useful to open the wizard at a particular screen position or with a different size, minimized to not cover the screen, or full screen.
In addition, the library contains examples with extended dialogs which can be shown inside the wizard (eg. with multiple Input fields). You can even define your own layouts and use the examples there as a starting point for your design.
Manual Test Wizard – Start[Bearbeiten]
This action opens the wizard with individual values for position, size and behavior.
If this step is not present, the wizard will be opened with default values when the first manual test step is executed.
InputPin Parameter:
- origin
- defines the upper-left corner of of the wizard window in pixel coordinates on the screen. It should be given as a Point instance with x/y coordinates.
- Example:
20@40means 20 pixel from the left, 40 pixel from top origin of the screen. Alternatively, you can writePoint x:20 y:40.
- extend
- defines the size of the window given as a Point instance with width/height values.
- Example:
600@400means 600 pixel width and 400 pixel height.
- wizardWindowMode
- also defines the size of the window; it can be one of:
- Normal
- the wizard window opens as specified by the above values (or defaults)
- Minimize
- the wizard wind gets the specified or default values, but will be minimized initially
- fullScreen
- size and position are ignored; the window will take the full screen
- fullHeight
- use the specified width but the whole screen's height
- fullWidth
- use the specified height but the whole screen's width
- fullWidthMinimize
- minimized in full width
- wizardDecorationMode
- defines the window's decoration:
- full
- as usual incl. minimize, maximize and close controls
- None
- no window controls
- Dialog
- with control to close
- allowInconclusive
- hide the button for "Inconclusive"; if off, the tester can only give success/fail results
Manual Test Wizard – Preset Values[Bearbeiten]
You can preset the layout before the wizard is opened the first time with this action.
The meaning of the values is as described in the above “Manual Test Wizard – Start” action; these will be used when the first manual test step is executed.
Manual TestStep (API)[Bearbeiten]
You'll find a actions for different uses in the library. The 3 most heavily used are described below.
be reminded, that the presented texts are not required to be defined as constants. They might of course be generated by another step. For example, they could could be read from a database or a file, or be generated dynamically from text fragments.
Manual TestStep (Text)[Bearbeiten]
This action presents the texts as simple text.
The input pin "testStepDescription" expects the text. This plain text will be shown "as-is" in the step and the same in the wizard.
Manual TestStep (HTML)[Bearbeiten]
This action presents the text in the wizard as HTML formatted text.
The input "testStepDescription" expects an HTML string. You schuld have some experience with HTML, as the input must contain valid HTML syntax. However, you may also put the text into an attachment or a document element and use the document editor to enter HTML.
Notice: the embedded HTML viewer only supports a subset of the full HTML. For example, the style element is unsupported and tables do not have the full set of features).
The HTML-viewer in the wizard will present the text formatted.
Manual TestStep (SimpleWikiStyle)[Bearbeiten]
A text format commonly used in Wikis (so called "Wikistyle") can be used to format simple bullet lists, headlines etc. without a need for HTML. For that, text in Wiki-style can be internally translated to HTML and presented as such.
The input "testStepDescription" expects the Text in simple WikiStyle syntax. The formatting rules are simple:
- headlines
- lines starting with
"="are presented as headline. Subchapters with"=="and"===": - = ("<h1>")
- == ("<h2>")
- === ("<h3>")
- Horizontal Line
- lines starting with or containing only a single
"-"(minus) will be presented as a horizontal separating line (i.e. <hr> in HTML)
- Lists
- lines starting with
"*"(star) are presented as <li> ("Bullet List"). - All other lines are unformatted. In addition, you may embed HTML tags (for example "<br>").
Here as well, the text is presented in the wizard in an HTML viewer.
Manual TestStep (MarkDown)[Bearbeiten]
A text format commonly known as MarkDown can be used to create a formatted text format with headlines, bullet and numbered lists, etc. without a need for HTML. For that, text in MarkDown will be internally translated to HTML and presented as such.
The input "testStepDescription" expects the text in markdown syntax.
The formatting rules are simple:
- Headlines
- A line starting with "
#" is treated as headline. - The number of "#"s defines the level e.g. "###" will be converted to "
<h3>"
- Horizontal Line
- A line starts with "
---" will be converted to<hr>.
- Bullet List Elements
- A line starts with "
-", "+" or "*" will be converted to<li>inside a bullet list (<ul>..</ul>). - Nested lists are possible.
- Numbered List Elements
- A line starts with a digit will be converted to
<li>inside a number list (<ol>..</ol>). - Nested lists are possible.
- Forced Break
- A line ending with a "\" forces a line break.
- Paragraph
- An empty line will insert a new paragraph.
- Text formatting
- Italic (
*):
*text*or_text_: Text is shown in italics.
- Bold (
**):
**text**or__text__: Text is shown in bold.
- Italic and Bold (
***)
***text***or___text___: Text is shown in italics and bold.
- Code (
`)
`text`: Text is shown ascode.
- Italic (
All other lines are left unformatted, so you can embed plain html for formating.
Creating and Using own GUI Layouts[Bearbeiten]
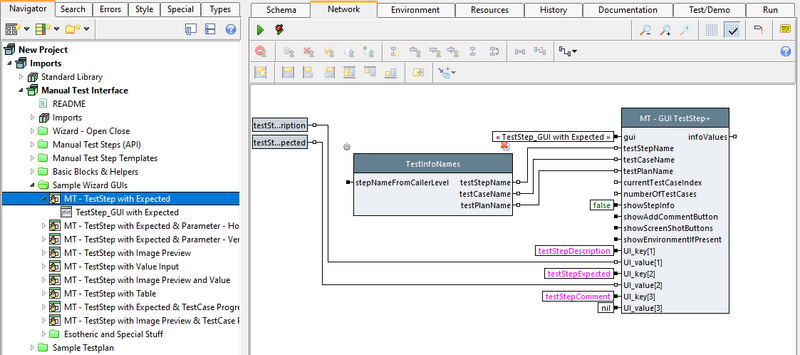
If you want to further customize the layout of you test steps, you can also create your own GUI and fill that with your content. In the folder Sample Wizard GUIs of the Manual Test Interface you can find several examples that you can use as inspiration or starting point to create your own layout.
As you can see, these examples consist of the test step and a GUI block. The core of the test step's network is the block MT - GUI TestStep+. This block is doing all the magic. It takes the GUI block at its first input pin. The other pins are parameters for the wizard and aspects for the GUI. Aspects are like named values, you can use the name of an aspect in some component, e.g. as the text to be shown, and when starting the test, the value of that aspect will be filled in there.
The block MT - GUI TestStep+ provides both predefined aspects at the top pins (for them there are also basic blocks to determine their values) and an unlimited number of aspects you can add through the variable pin group at the end. The output pin infoValues returns a Dictionary containing all the aspects that where set and their values. You can use this to get the values of user inputs from the GUI.
So let us look at the usage of some widgets that are used in the samples in the library and how to set them up in the GUI editor.
- Label
- A label is useful to display simple text. Its two most important fields are Label Text in the Basics tab, where you can set a fixed text for the label, and Label Holder in the Aspects tab, where you can set the aspect, that provides the text for the label. In the Widget Gallery you find the Label under Text.
- The GUI block TestStep_GUI with Expected has two labels at the top, one with the text
Current Test Stepset as Label Text, and one with the aspect testStepName used as Label Holder. So the second label will get its text from the value at the pin testStepName of MT GUI TestStep+ if the GUI is used with it. 
- EditField and TextEditor
- EditField and TextEditor can be used to enter text, where EditField is for a single line and TextEdit can be used for multi-lined text. Their text is set in the Model which you can find in the Basics tab. In the Widget Gallery they are both under Text.
- Take a look at MT - TestStep with Value Input. Its GUI has an EditField with the Model theValue. You can see in the network, that theValue is defined as UI_key[2] with the value nil, meaning it is initially empty, and from the output at the pin infoValues the value the user set in the GUI is extracted by a Collection [ ElementAt ] block.
- At the bottom of the GUI there is a TextEditor for the comment. The aspect testStepComment is predefined and MT - GUI TestStep+ will handle it directly and log the comment, so you see nothing of it in the network.
- To display the test step description the GUI also uses a TextEditor, as it provides scrollbars if the text needs more space than provided. However this TextEditor has been made read-only, a property you find in the Details tab.
- Images
- There are several possibilities to add images to your GUI. You can use Label and its Label Holder to your image. That is suitable for small icon-like images. For larger images you can use an ArbitraryComponent with an ImageView. In the Widget Gallery you find it under Embed. There is a scrollable and a non-scrollable variant of this widget. Set the Model to your image and View / Class to
ImageView, both in the Basics tab. - As a use case take a look at MT - TestStep with Image Preview. For this teststep there are also some callbacks defined, to further adjust the appearance some components, but do not worry, if you don't understand it, you do not necessarily need them.

- ProgressIndicator
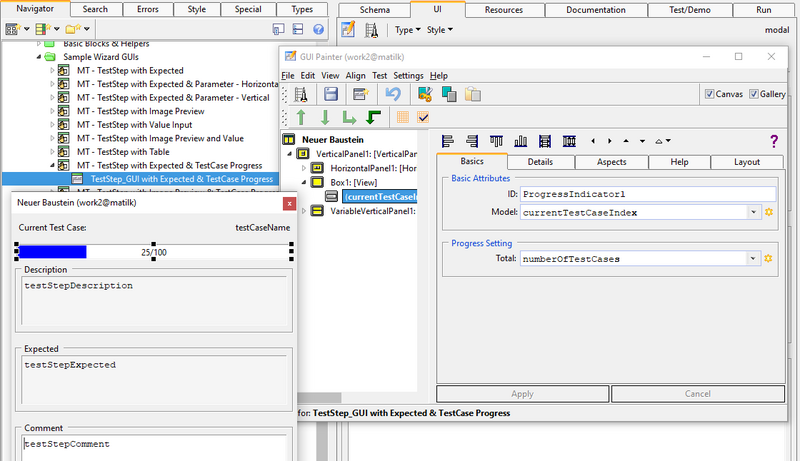
- If your manual test consists of a large number of test cases, you might want to add a progress indicator to the GUI, to see how much you already accomplished and how many test cases remain to be completed. Of course there are other use cases as well, but this one can be seen in MT - TestStep with Expected & TestCase Progress.
- The ProgressIndicator takes the progress as Model. Optionally you can set Total (also in the Basics tab) which will be 100 otherwise. So you can either provide the percentage in the model or the absolute number and additionally the total. In the Details tab, you can check Show As Proportion, to change the label inside the ProgressIndicator to show amount of total instead of the percentage, or uncheck Show Percentage to not show a label at all.
- MT - TestStep with Expected & TestCase Progress uses the predefined aspects currentTestCaseIndex and numberOfTestCases for model and total, which are calculated by the block TestCaseProgressInfo. This setup only works if used inside a test plan; nested test plans will work as well.
- You find the ProgressIndicator in the Widget Gallery under Misc. There is also a round variant for a pie chart like representation.
Manual Test Example (Step by Step Tutorial)[Bearbeiten]
Step 1: Create a New Test Suite[Bearbeiten]
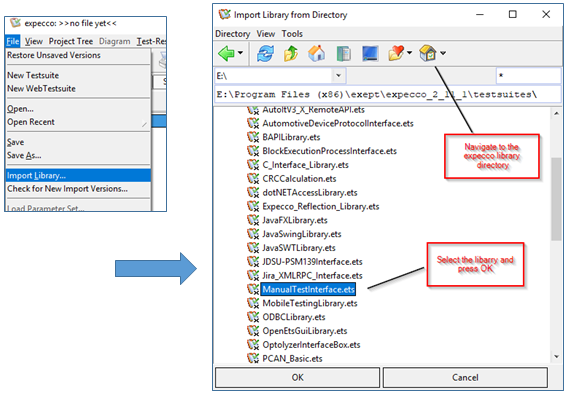
Open expecco and create a new test suite. You may of course also add manual test steps to any other suite. Then import the Manual Test Library (which is done automatically, as soon as you create a manual test step or test case).
Step 2: Create a Test Case[Bearbeiten]
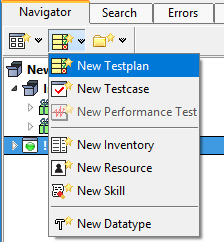
Notice: with expecco22.1, the following can be done much easier by selecting an appropriate item from the action pull down menu. You'll find separate entries for "Manual Test Case" and "Manual Test Step" creation, which will set the appropriate tags for you automatically.
Next we have to create a test case item in the tree. The easiest way is via the toolbar menu, which creates an action with the TEST-CASE tag already attached, and it appears with its own icon in the tree.
Remark: the TEST-CASE tag is irrelevant, regarding the later execution; it is only a tag to affect its presentation, and makes it easier for you to spot test cases, test steps as oppose to the helper action. Other attributes of the appearance are specific colors or icons; you can define them as to your personal preferences to enhance the "readability" of your suite.
Note: please always give your test cases (and other items) reasonable and descriptive names. Usually, test cases should include a reference number, which refers to the corresponding items or chapter in your test- or requirements specification. In addition, append a short Description after the number so the humans also see what the individual steps do.
Example: "TC-4711 Login with valid Name".
Note: it has turned out to be a best practice to name test cases as "TC_xxx" and test steps which are to be reused in other scenarios as "TS_xxx". Other helper actions should have their function in the name.
Also please add a short documentation (Documentation-Tab). This helps to find actions and is also useful as these will be shown as tooltip ("fly by help") when you hover the mouse over a tree item or step in a diagram.
Alternative:
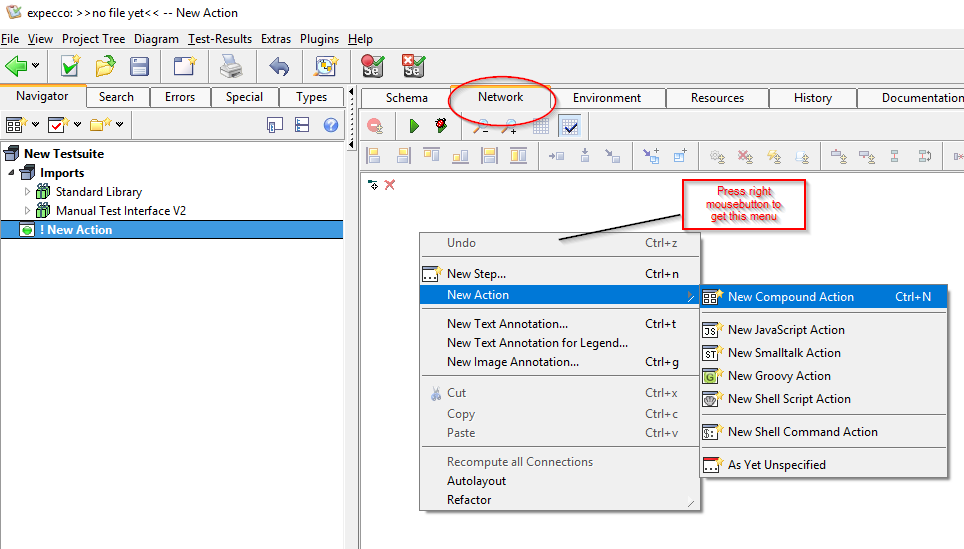
You can also mark actions afterwards as test case, by adding the corresponding tag later. Click first on "New Compound Action":
then navigate to the "Documentation" tab of the action and add the tag "TEST-CASE" to the list of tags at the bottom of the editor. Confirm by pressing "Accept" in the editor pane on the right side. You can also select multiple actions and use the action-tree's popup menu function under "More" -> "Mark as Test...".
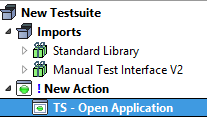
The icon shown in the project tree changes to "test case".
Thus, by adding the tag, any action may later be marked as being a test case or test step. You can also use the tree's popup-menu to add this tag to multiple actions at once.
Step 3: Create a Test Step for a Test Case[Bearbeiten]
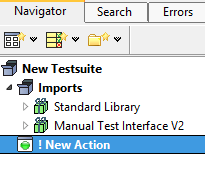
Navigate to the network tab of your test case. Initially, this is empty and has to be filled with individual steps. (sorry, in the picture below this is still named "New Action").
There are various options to add a step:
- by drag & drop from the project tree,
- by copy-paste from the project tree or from another diagram
- by searching among existing actions (dialog), directly in the diagram (menu: "New Step...").
- by creating a new action (dialog), directly in the diagram (menu: "New Action...").
In the following, new steps are added via the network's popup menu (right click). The menu item "New Action" opens a dialog which creates a new action and adds it as step into the network:
This opens a little input dialog. Enter the name of the new test step, honor the rules as above.
Note: If you intent to reuse the test step in multiple test cases later, the name should not contain step-number or test case number. Use names like "TS - Open Application".
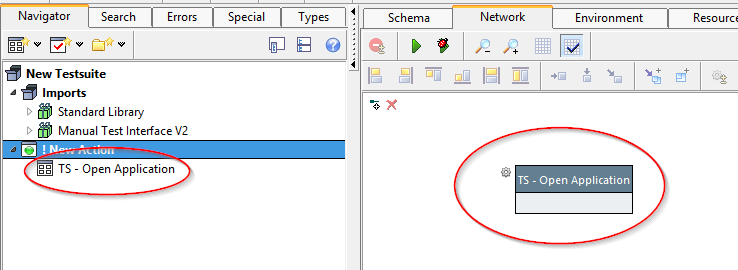
After confirming the dialog with OK", a cursor appears to let you specify the position of the new step in the network. Place the step and confirm the changes with "Accept" to save the editor's changed network in the tree.
The project tree now shows the new step below the test case.
Sorry, but actions created this way did not automatically get the right tag (in previous expecco versions). Therefore, you may have to navigate to the test step's definition in the tree, got to the documentation tab and add the "TEST-CASE" tag (or better yet, a "MANUAL-TEST-CASE" tag. As usual, click on "Accept" when done.
Step 4: Define What is to be Shown in the Wizard[Bearbeiten]
We now define what the wizard should show when the "TS - Open Application" Step is executed.
Up to now, we did not actually define whether this step will be a manual or automated test step. This is done now, by placing an action from the Manual Test Library into our action step.
Notice:
- In theory, we could have added the manual test step right into the test case. However, this has the disadvantage that this might require more rework if we ever want to change this step to a fully automated one. We would have to change the test case and probably all places were the test step is also used.
- Wrapping the actual wizard action into a separate action, enables us to change the inside at any time later, without a need to change all uses of that step. We'll thus get more maintainability and cost reduction in the future.
- It is a good practice to place any action which might be changed in the future into a separate compound action, even if it seems strange to have such simple diagrams which only consist of a single step.
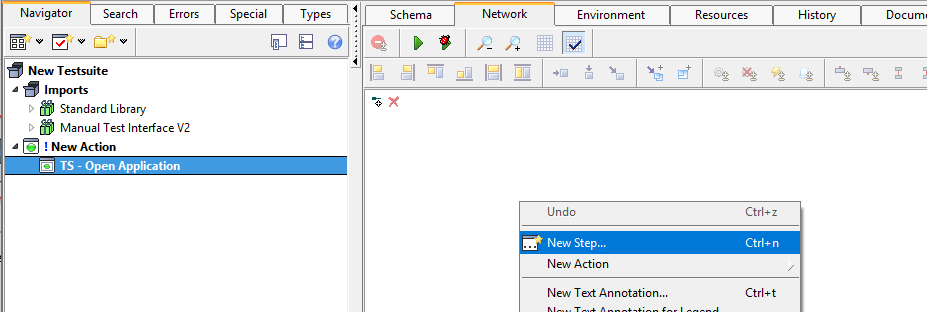
Now choose, how the text should be presented to the test and how you want to enter it (i.e. Text/HTML/Wiki). For that, select the test step action in the tree, go to the network and choose "New Step..." from the popup menu (this time not "New Action", as we want to select an existing action instead of creating a new one):
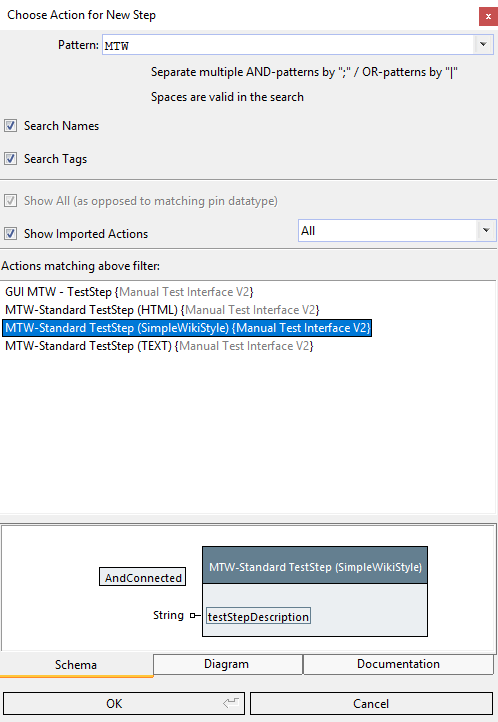
Choose the action to be placed into the network as step. If the list is too long, filter by listing only individual libraries (in this case: "Manual Test Interface") or by name (you might want to filter for "HTML" or "Wiki" here) or by tag.
In this example, we choose: "Manual Test Template (WikiStyle)" (the action shown in the screenshot is somewhat obsolete - therefore different).
Confirm with "OK" to add the step to the diagram.
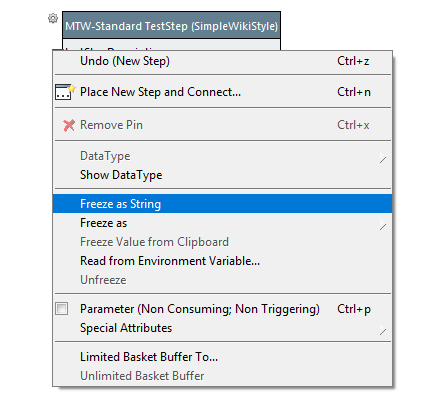
Doubleclick on the input pin named "testStepDescription" to open an editor for the text. Alternatively, choose "Freeze as String" from the pin's context menu to open the text editor.
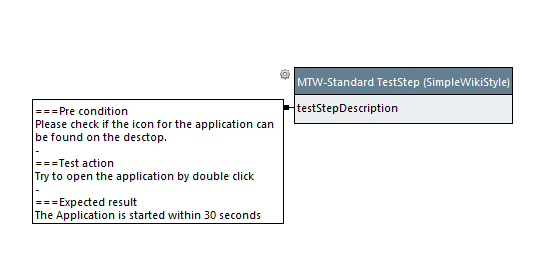
Type the text which is to be shown in the wizard e.g. according to WikiStyle rules.
Again confirm with "OK". The text is now attached to the input pin as so called "Freeze Value".
Finally, click on "Accept" to make your changes permanent in the project tree.
Step 5: Execute the Test Case in Isolation and Verify the Wizard's Presentation[Bearbeiten]
To execute the test, select the test case in the project tree and navigate to a tab with the Play button in its toolbar, e.g. Schema, Network or Test/Demo, then click it.
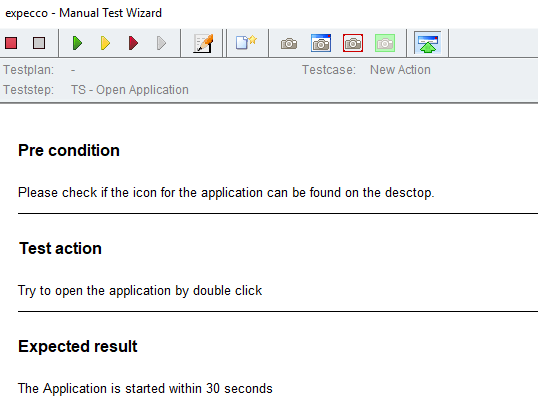
The wizard appears and shows your text:
Expecco will now wait for your input in the wizard. If you click on the green Play icon there, the wizard will advance to the next step and finish after the last test step (in this case, as this is an individual test being executed in isolation, it will finish right after the first step). The execution will be marked as "Passed" (assuming that you clicked on "green").
The wizard stays open and can be closed by hand.
Step 6: Creation of a Test Plan, Automatic Open/Close of the Wizard[Bearbeiten]
Previously, the test case was executed in isolation ("single action test execution"). This is good practice: test your actions in isolation so that you don't have to step through long sequences every time you encounter an error (or wrong texts).
Anmerkung:
- Only then should you test longer sequences in which multiple cases run one after another. In this simple example, we do not expect any problems; however, if you create eg. a GUI Test, every test case should leave the tested system in a defined state, so that the next text can start with well known initial conditions. Typical errors are left-open dialogs, popups, wrong selections in menus, tabs or selection lists etc.
- Therefore, make sure that such situations are prevented by running individual actions in isolation.
Creating a Test Plan[Bearbeiten]
Select your new test plan (or create one, if you haven't yet) in the project tree. Drag the test case action and drop it into the list of test case items on the right. As you may have noticed: a test case action can be placed into multiple test plans, and thus be easily reused. Therefore, the position of an action in the tree is not relevant for the test plan; you may place actions wherever and however you want to organize your tree, and group test cases and action independent from where they are used in test plans.
If you like, repeat the previous steps to create different test cases - possibly with multiple test steps.
Defining Pre- and Post Actions[Bearbeiten]
Finally, we want to define actions to automatically open the wizard with a well-defined size at the beginning. As a reminder: you don't need this, if you are fine with its default appearance. However here we want it to come up in a full screen window.
Also, after the test plan, the wizard should be automatically closed.
For a solution, there are 3 ways to go, although we recommend the last one below:
- (1) Open and Close actions as part of the test plan (i.e. first and last actions in the list)
- (2) Open as Pre-Action; Close as Post-Action (see corresponding fields below the list in the test plan editor)
- (3) Define wrapper actiones; one to open the wizard, another to close the wizard and define these two as pre- and post actions.
(1) is not a good Solution, as it may leave the wizard window open, in case the test plan runs into an error or is aborted. That is not a problem if you sit in front of the screen to close it, but it may be bad if you automize the test run (eg. via Jenkins) and run it unattended. A wizard's window may in this case be kept alive on the screen (until expecco is terminated, or another test ist started).
(2) is much better: the post action will always be executed (as a cleanup), even if the test plan's execution is aborted for whatever reason.
(3) is even better as we now have a common place to add any additional cleanup actions in the future (eg. turn off power, remove temporary file, etc). And more can be added later without much maintenance effort.
Therefore, we will define two new actions, which will be called "PreAction" and "PostAction", and define them as such in the ist plan editor:
Add the "Manual test Wizard -Start" action as step to the PreAction (by drag & drop or via "New Step...");
and also the "Manual test Wizard -Stop" action to the PostAction.
A configuration might look like:
Finally, define those two actions as Pre- and Post actions in the test plan. For that, go to the test plan editor and drag the corresponding action into the fields at the bottom of the editor.

Click "Accept" to save this change.
Now when running the testplan, a wizard will be automatically opened at the beginning and closed at the end.
More Examples[Bearbeiten]
A sample test plan is found in the Manual Test Library itself. It contains multiple manual steps.
Also, find and open "ManualTestExample.ets" in the delivered samples folder. This contains a ready to start suite with an example similar to the one above.
