VNC Plugin Reference/en
Inhaltsverzeichnis
- 1 Introduction
- 2 When to use VNC or Local Screen Automation
- 3 Philosophy
- 4 Preparation of the System Under Test
- 5 Using the GUIBrowser
- 6 Locators
- 7 Interactive Definition of Bitmap Locators
- 8 Defining Buttons and Similar Elements
- 9 Bulk Import of Bitmaps for Locators
- 10 Possible Problems with Image Finding
- 11 OCR (Optical Character Recognition)
- 12 Recorder
Introduction[Bearbeiten]
Local screen automation and VNC automation behave the same, except for the underlying mechanism for screen image fetching and event handling. Therefore, the following describes both mechanisms.
The VNC automation plugin interfaces to a local or remote application via the RFB protocol, which enables interaction with the screen or a remote screen on any other machine in the network. The Local Screen automation plugin interfaces to the local screen only.
Using VNC (or local screen automation) has one big advantage, and a number of disadvantages:
- [++] it allows interaction with and the testing of almost any application, and no instrumentation or recompilation or UI automation support of the tested application is needed, given that a VNC-server is running and reachable on the target system, or the target's screen can be shown on the local screen somehow.
VNC servers are available or already installed on almost any operating system or device, even for mobile devices, embedded control systems, head units in cars, CNC machines etc.
In addition, screen-viewers are available for other applications, for example emulators or screen-replicators.
- [-] whilst all other UI testing plugins interact with the tested application directly (via a protocol which enables expecco to reflect (query) on internals of the app), the screen interfaces only see the screen as a pixel array, and can only send events based on screen coordinates. No information about the widget element hierarchy or internal attribute can be interchanged via VNC.
Thus, with VNC, expecco cannot ask the application about the position of GUI elements and cannot ask for any internal attribute values.
Expecco must rely on bitmap comparison algorithms in order to detect UI elements.
- [-] the VNC plugin cannot provide the exact values of internal attributes of widget elements (text, labels, enable state etc.). Expecco must rely on optical character recognition (OCR) algorithms in order to read out displayed values.
- [-] VNC is very sensible to changes in the layout and look of the application.
- [-] the geometry information (i.e. the location of widget elements) is kept inside expecco, and cannot be queried from the application.
When to use VNC or Local Screen Automation[Bearbeiten]
In view of the above limitations, you should use the VNC/Local Screen plugin, if no other plugin is usable with the application.
I.e. if one of the following applies:
- it is written in C/C++ and cannot be instrumented or recompiled
- it is written in Java and the JVM cannot be started with additional jars being loaded and it cannot be accessed via the Windows Accessibility Protocol, or the JVM provides no debugging interface (i.e. embedded Java)
- it runs under Windows and does not support the Accessibility API, and the other lightweight automation methods (autoIt and Windows Access Library) do not work for you
- it is an old style (hand-written) X-windows application (Xt or non-widget library)
- the target app or operating system of the target opens additional windows/dialogs, which cannot be controlled by other mechanisms and which need to be closed or confirmed. Examples are operating system warnings ("disk full") or keyboard entry windows on mobile devices.
- the target manipulates the graphics frame buffer directly
Of course, a prerequisite is that the target system does provide access to its graphics system via the VNC protocol, or its screen can be displayed on the local screen via some other mechanism.
Philosophy[Bearbeiten]
To allow for a maximum of flexibility, the VNC plugin uses description objects, which describe where and how to find UI elements. These descriptions are called "Screenplays" (or "Storyboards") and are typically stored in attachments inside the test suite.
UI elements are addressed either via a bitmap image search algorithm, or by screen coordinates.
Screenplays[Bearbeiten]
A screenplay describes the UI-elements of an application. It is structured into multiple "Scenes", which correspond to pages/tabs or states of the application. Whenever the application changes its widget layout (i.e. changes to another UI-hierarchy or layout), a new scene (stage-description) can be activated.
Finally, each scene contains "Players" (UI-elements), and descriptions on how to find them. More on this below, in the section on locators.
The testsuite refers to UI-elements by scene- and element (player) identifiers, and the current active scene provides the information of where and how to find them on the screen. Simple applications or applications where the same image is used for the same logical function, a single scene can be used.
Screenplays, Scenes and Players are described in a human-readable, textual format in attachments (or external files). The GUIBrowser can read, modify and write such attachments. They can also be imported/exported in some standard (XML) format. Import is especially useful if app-developers can provide this information from their IDE/Window builder files. Expecco uses a format similar to the FXML format, so it may be easy to exchange such description files with app developers (if required, using an XSLT transformation procedure).
Preparation of the System Under Test[Bearbeiten]
You need a VNCserver to be installed and running on the target system. Any freely available or commercial VNC/RFB server should work out of the box (Protocol version 3.3 or higher). Is is known to work (i.e. we tried) the following VNC servers (as target system):
- Android (Samsung tablet): alpha VNC server (Beta version) (no rooting required)
- OS X (MacBook Pro/Yosemite 10.10.5): Remote Desktop (already part of OS X) or Vine Server 4.01
- Xvnc (Gentoo Linux)
- TightVNC 2.7, 2.8 (Windows): TightVNC
- Sinumerik control unit
You can try out the connectivity alone via the "Plugins" → "VNC GUI Testing" → "Open VNC Viewer" menu item.
Using the GUIBrowser[Bearbeiten]
The VNC plugin is well integrated into the expecco GUIBrowser framework. It now seamlessly integrates the definition of geometric information (screenplay, stage & player definition) with the recording process. The following gives a sample session, where a login procedure is recorded on a remote (OS X) system.
Opening the GUIBrowser[Bearbeiten]
Open the GUI Browser by clicking on the ![]() -icon in the toolbar (or select the "Plugins" → "Gui Testing" → "Open GUI Browser" menu item).
-icon in the toolbar (or select the "Plugins" → "Gui Testing" → "Open GUI Browser" menu item).
Opening a VNC Connection[Bearbeiten]
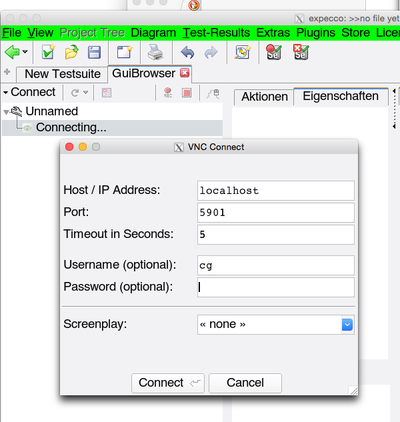
Click on the "Connect "-button and choose "VNC Gui Automation ".
A connect dialog will appear, asking for the hostname (or IP address) of the target system, a port-number (which is 5900 for screen #0, 5901 for screen #1, etc.) and some other optional values (user, password and screenplay). For now, you can ignore those 3.
Notice that some VNC servers will disconnect if the connection is idle (inactive) for some time. Especially the Sinumerik VNC server is known to require any arbitrary request to be sent in regular time intervals. Enter a number of seconds (typically 30) into the "Keepalive" field, to enable automatic keepalive messages from expecco to the VNC server.
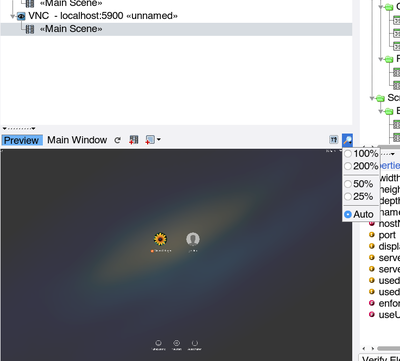
When connected, the GUIBrowser's tree is updated and an initial "Main Scene" is appearing; however, no widget elements are presented in the screen; these and their locators need to be defined first (or their definitions be loaded from an attachment). In addition, a screenshot is shown in the lower left area if you have the "Preview" button enabled.
In this session, a connection was made to an OS X system, and the MacOSX login screen is shown in the preview:
Now, you have two options: either open a recorder, which combines interaction, recording and screenplay definition, or define the screenplay in the preview and add action blocks from the action/properties subview.
Both have similar functionality and allow the same operations; however, the recorder displays a live image of the target system, whereas the preview shows a static "snapshot", which needs to be updated manually. Depending on the bandwidth of your network/USB connection and/or the speed of your target system, either may be a better choice. Also, because the preview shows a frozen snapshot, it may be easier to define elements there, if the application changes its look dynamically (i.e. to specify the bounds of dynamically disappearing menus or popup dialogs).
Locators[Bearbeiten]
Inside the suite, elements are referred to by their elementID (within the current scene). For example, a "Button-Press" action has input pins for the elementID (a string), the mouse-button number and a position relative to the widget's origin as argument. Expecco will then find the element in the screen's snapshot (defined by its locator in the current scene), translate the coordinates to screen coordinates, and send a VNC button-press to the remote VNC server.
Different types of locators are supported:
- bounds
- bitmap
- bitmap position + bounds
- between two bitmap images
Bounds Locator[Bearbeiten]
For a bounds locator the origin+corner (i.e. the rectangular bounds) of the element are stored in the scene, and this is used to locate the element - independent of what is actually shown on the screen. This kind of locator is useful, if you can get the geometry information from the widget developers, or when the position of the elements remains constant (as for example the buttons in a Siemens PLC's user interface).
Of course, expecco cannot verify that what is shown at this position is really the expected element - it will simply trust your given bounds and click or type into those bounds (however, it is possible to verify the element's label text or image using OCR or image compare).
Bitmap Locator[Bearbeiten]
Here, a "prototype bitmap" is kept in the scene information, and the bitmap is searched on the screen. The actual bounds are then computed dynamically at test-execution time.
This makes the test less affected by changes in the exact position of the element, but more affected by changes in the look (i.e. changed icons, colors or labels). The bitmap to be searched can be kept inside the testsuite itself (as attachment) or in external bitmap files. In general, it is recommended to keep them inside the testsuite; however, if you can get the set of images from the app development team (from their source repository), it may also make sense to keep them separate.
When the test is executed, expecco will first scan the whole screen for occurrences of that bitmap pattern, and complain if not exactly one is found.
If none is found, the pattern is obviously not present on the screen, or it was not found for some other reason, even though it looks like (read more on image finding below).
If the element is present multiple times, you can change the locator's element-name to an indexed name: "name[n]". This will then refer to the n'th occurrence of the pattern, starting at the top-left towards the bottom-right, and n being an index starting at 1.
Combined Bitmap Position + Bounds Locator[Bearbeiten]
This is similar to the bitmap locator described above, but here, the bitmap's found position defines an anchor to the actual bounds, and the bounds are translated relative to that position. This kind of locator is useful, if an input field is always located to the right or below some known bitmap pattern or label.
Between two Images Locator[Bearbeiten]
Here two bitmaps are searched, and the bounds of the element are defined as the area between them. The two fencing bitmaps can be defined to delimit the area horizontally, vertically or diagonal. This kind of locator is useful to detect elements like scrollbars (defined by their two scroll button images) or buttons (defined by their frame-borders at opposite edges).
Interactive Definition of Bitmap Locators[Bearbeiten]
Initial Capture from the Screen or Preview[Bearbeiten]
Choose the locator's type from the menu, and select the area of the image in the appropriate view. Most of the time, you will select from the preview, but if you find the bitmap already on the screen, it can also be selected there (footnote: the OS X version currently only allows images to be fetched from one of expecco's windows)
If the locator is a dual-image locator (i.e. fencing the area between to images), the image capture is performed in 3 steps:
- define the overall bounds,
- define the first partial image
- define the second partial image.
For a walkthrough of this process, see the chapter "Defining Buttons and Similar Elements" below.
Postprocessing[Bearbeiten]
When selecting an image's area, you will often (most of the time) select an area too large and maybe also areas which should be ignored in the image search.
Many applications blend the colors of bitmap images; the boundary may be antialiased or there may be areas where the background shines through. These will look different whenever the background color of the application changes, and will therefore not be found in the image search.
To deal with this situation, you have multiple mechanisms to solve this:
- cutting,
- masking,
- changing the image compare algorithm (described in the next chapter)
- changing the pixel error tolerance (described in the next chapter)
Use the image editor's crop functions to cut the image down to size. Define a mask to exclude areas from the comparison.
Cutting (Crop)[Bearbeiten]
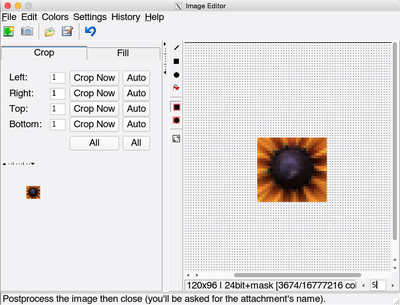
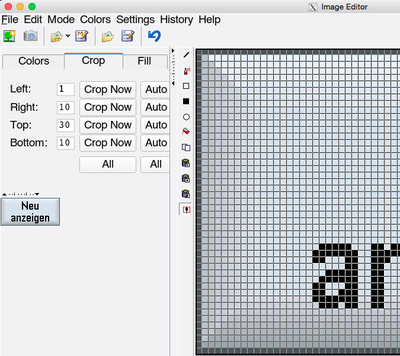
Either cut the image incrementally (in the editor's "Crop" tab),
or select a whole new subimage with the ![]() -button.
-button.
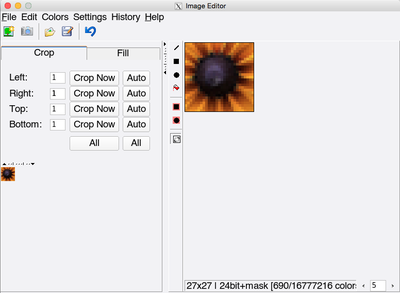
Cut the image down to an area which contains only pixels which are not affected by the background/alpha blending. In this case, you could cut it down to a small rectangle, only keeping the flower's inner area:
Masking[Bearbeiten]
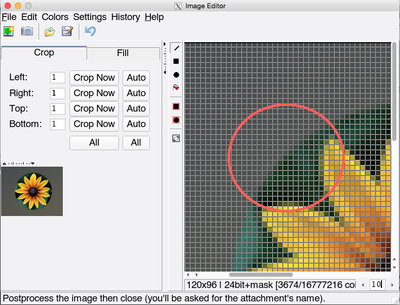
Masking is especially useful at the boundary of images which are antialiased or which have areas where the background shines through. Here is the example image from the OS X login screen:
the highlighted area will contain different pixels, depending on where the flower-icon is positioned on the screen. Both because the screen's background has a color gradient (the brightness of the background changes) and because the colors of the image's boundary are blended with the background color (alpha channel blending).
In this particular situation, cutting as described above is sufficient. However, you could also mask out pixels which should be ignored:
Notice that the image search is much slower, if masking is involved. Therefore, cutting is always the first choice.
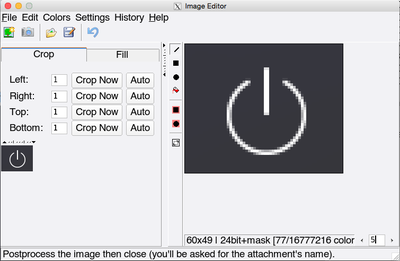
However, cutting is not sufficient, if the bitmap contains transparent areas, as in the following image:
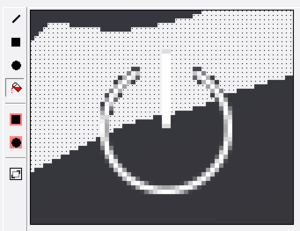
which consist almost completely of transparent areas, with the background shining through. Here, you should define a mask, by flood-filling the background areas.
Flood-Filling with a Mask[Bearbeiten]
To flood-fill an area with a mask, select the "Flood-Fill" button and click on any pixel which is inside the area to be filled.
By default, the flood fill operation fills all connected areas which have the same color as the pixel you clicked on. This works if there is a constant background. In the above example, you will find that only parts are filled, as a consequence of the background's color gradient.
To get around this, change the "Flood-Fill Tolerance" to some non-zero value. The values specify by how much the hue (that is the color) and the brightness of a pixel may deviate from the clicked pixel and still be considered to be "in the area". A value of zero means: "must be exact", a value of 0.5 means: "50% deviation allowed".
We suggest, you start with 0.1 (which works most of the time) and try again. You may first undo the previous incomplete fill. With "0.1" tolerance, the background area will be correctly filled:
Rectangular or Circular Subareas[Bearbeiten]
You can quickly define masked subareas with the two "black-area-in-red" buttons of the vertical toolbar.
Verifying that your Image is Found[Bearbeiten]
When finished with the definition of an element's image, click on "Verify Element" to make sure that it is found on the screen - and that it is not found multiple times (1). If not, you should repeat the post processing step by selecting the element's "Edit Bitmap" menu function or provide more error tolerance as described below.
1) If the same image is found multiple times, you can later add an index to the locator, eg. to click on the first found image, you'd use "element[1]" as locator, "element[2]" for the second etc.
Error Tolerance in the Image Comparison[Bearbeiten]
It can happen, that an image is not found, even though it "looks as if it should be" from a human point of view. Possible reasons are:
- the graphic accelerator (graphic card) renders the image differently. For example, when lines are smoothed (antialiased), different grey values or color blending algorithms may lead to corner pixels to have different colors on different hardware (or even different versions of the operating system).
- color space adjustments (white point) may shift colors slightly (blueish / redish).
- different backgrounds around the image are blended with the image to different bounds. This especially happens with alpha blended images.
To handle such cases, image comparison can be made "more tolerant" by additional parameters:
- pixel error tolerance
a percentage value by which each individual pixel may differ - overall percentage of pixels which may differ
- overall absolute number of pixels which may differ
- ignore minor differences in the color (the color on the color wheel or its brightness)
- various color ignoring algorithms (compare greyscale version / compare black & white version)
If the image verification described above fails, you should change one of the above parameters, until an exact match is found. If all fails, we are sorry, and you may have to fall back to a geometry based locator (maybe relative to some well known pattern on the screen).
Defining Buttons and Similar Elements[Bearbeiten]
Elements like buttons or input fields often consist of a frame surrounding an icon or label.
Typically, the frame looks the same for all elements of this type.
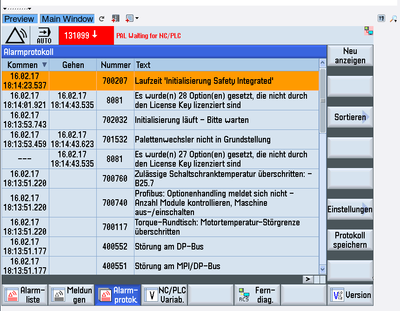
Here is a sample image of a PLC (German: "SPS") GUI with multiple such buttons at the right and bottom:
Obviously, you do not want to capture the numerous buttons individually (although this might be less work, if you can import the bitmaps, as described below).
You can define a template, which will match all buttons and then use indices to refer to the concrete buttons in the test. To define all buttons from a single template, proceed as follows:
Capture one of the Buttons as a Template[Bearbeiten]
For template matches, we have 3 possible matching algorithms to choose from:
- define left and right areas to match
- define top and bottom areas to match
- define topLeft and bottomRight (diagonal) areas to match
The first two will find only buttons which have the same height and width as the template. The diagonal search will find all buttons, independent of their size. Whichever is better for your application depends on the application.
Here, we will use the "diagonal" match:
Select "Area Between TopLeft and BottomRight Images" from the "New Element" ![]() menu.
menu.
Grab one of the buttons and cut it down to size in the editor:
Then close this first editor, to proceed with the next step, where the top-left fencing image is defined. The editor for the top-left image opens automatically.
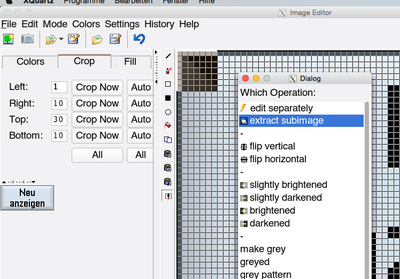
Cut this down to a few pixels using the "Extract Subimage" function.
For this, first select "Special Functions" ![]() ,
then select the rectangle and finally choose "Extract Subimage":
,
then select the rectangle and finally choose "Extract Subimage":
Here, a small 6x6 top-left image is extracted because some of the buttons draw their textual label over the left or right frame area, and this area should therefore be ignored later in the image search. (because of this, a left-right fenced image locator will not be able detect all buttons).
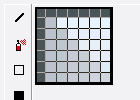
Now the top-left image looks like:
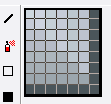
Proceed in the same manner with the bottom-right image to make it look like:
finally, give this template element a name ("button") and confirm the dialogs asking for the attachment names.
Verification correctly confirms that 16 buttons were found (including the small scroll button in the lower right). These can be addressed as "button[1]" .. "button[16]". As expected, the blue button at the bottom is not found by this locator. You should repeat the above for the pressed button, and define a separate locator named eg. "pressedButton".
If the small scroll button should not be matched, a larger top-left or bottom-right image (especially: a higher one) should be used. This can be accomplished by re-editing the images with the tree-element's "Edit Original Image" menu function (or by editing the attachment bitmaps in the regular expecco project tree). In this concrete example, using 7x7 images does the job, and all buttons are found by the verifier.
Defining the Instances of the Template Button[Bearbeiten]
--- to be documented ---
Bulk Import of Bitmaps for Locators[Bearbeiten]
If you already have the bitmap images (or can get them from the app developers as PNG, TIFF, GIF or BMP files), you can bulk-import them via the "Extras" → "Tools" → "Import Attachments" menu function.
Then, in the GUIBrowser select a scene element, and choose its "Define ScreenPlay Elements from Bitmaps In..." context menu function. This will create bitmap locators for all those existing bitmaps.
Possible Problems with Image Finding[Bearbeiten]
Mouse Pointer[Bearbeiten]
The image matching algorithm can be disturbed by the mouse pointer, which may be located over an area and could be grabbed with the image. You should therefore either make sure that the cursor is invisible, or positioned in a non-interesting area. Notice that the pointer-display behaviour is different between VNC server implementations: some deliver a screenshot without mouse pointer and the above does not apply.
Font Size affecting Element Dimensions[Bearbeiten]
Obviously, if you define elements not by diagonal fencing images, they will not match if the element's sizes depend on the application's font settings. In general, it is not a good idea, to allow different font and color settings in the tested application.
Language Setting of the Application[Bearbeiten]
The same is true for national language variants.
OCR (Optical Character Recognition)[Bearbeiten]
To retrieve label texts or the contents of input fields, expecco uses an external tool for character recognition on the bitmap (screenshot) of a located element. The locator mechanism is the same as described above.
There are both free (and open source) tools like Tesseract and expensive high performance tools available on the market (although the free Tesseract OCR framework is quite good and served well in the past).
As a very first step, you have to install, define and configure the OCR framework to use. For legal reasons, it is not deployed as part of the expecco suite, and you'll have to download and install it separately. We recommend "Tesseract" as a free tool, which is most easily done with "pip install tesseract" (assuming, you have Python installed before).
Then configure expecco via the "Settings" - "External Tools" - "OCR" dialog. This dialog includes a test area, where you can grab part of the screen and see what the OCR algorithm detects.
Typical Problems[Bearbeiten]
All OCR programs have problems in that some characters are too similar to be recognized correctly, depending on the font. Most typical is that the letter "O" looks too similar to the digit "0", or that both the digit "0" and "%" are too similar to the digit "8" (some fonts have a diagonal line inside the zero). Also "l" (lower case "L") often looks like the digit "1" (one) or "I" (upper case "i") in non-serif fonts.
To solve this, you can give additional constraints to the OCR program, when text is extracted:
- character constraints (eg. recognize only digits)
- word lists (give a set of well known words to be expected)
- national language
Be prepared, that OCR readout is not without problems, and that misreadings are quite common.
It is especially troublesome to verify numeric values, and you should always look for better ways to get your data. In the above example (PLC access), it is highly recommended to either access the PLC directly (using the OPC-UA or Siemens S7 or other PLC/SPS access library) or to fetch the real values from a service, measurement device etc.
OCR in the GUI Browser[Bearbeiten]
The library contains actions to extract the text, given a locator and constraints.
Recorder[Bearbeiten]
Recording Actions[Bearbeiten]
Due to the integrated recorder it is relatively easy to record action sequences and store them as new action blocks. However, you will have to define the UI-elements yourself (or import them from an XML object map description). To use the recorder, you need an existing connection to a VNC server.
Switch to the GUI Browser tab, which either shows an existing connection (if one was opened before) or in which you can connect to a VNC server as described above.
To start a recording, press the record-button ![]() .
.
A VNC recording window will show up, which displays the screen of the connected VNC server (in this case, the screen of a Siemens Sinumerik control unit).
You can remote control the device in this recorder window. Every action will be recorded and also sent to the device. The recording can be toggled inside the recorder window via its own record-button in the top left).
Automatic Element Definition on Click[Bearbeiten]
When clicking into the recorder window, expecco will try to find the image under the click position and verify that it is found exactly once on the screen.
Notice that this automatism may present a strange (big) search image iff eg. a clicked icon is found multiple times on the screen. The algorithm will then extend the image until there is exactly one match on the screen.
This happens especially, when the recorder itself currently shows the image.
A dialog will appear presenting this image, ask for the name of the element, and allowing for the image area to be refined.
The dialog will also look for text underneath the click position and present that as default element name. Depending on the capabilities of the OCR engine, the font and the resolution, this suggestion may be wrong. Obviously, no suggestion will also be made if no text is at the click position. In either case, you should enter a reasonable name into the dialog's name field.
Menu and Toolbar Items[Bearbeiten]
The VNC recorder offers the following items in its toolbar:
 - resume recording
 - pause recording
events will still be sent to the remote application, but not recorded - stop and close recorder
 - select in tree
 - highlight the element under the cursor
 - highlight all clickable elements
 - record as screen action
The mouse or keyboard action will be sent to the absolute screen coordinate without any element image search - add a new scene
 - add a new element
 - pick a point and copy the coordinate to the clipboard
 - pick a rectangle and copy the coordinates to the clipboard

