User Defined Menu Items
You can add your own custom menu items to expecco's main menu, and connect them to an action which is executed, when the menu item is selected.
This is very useful to automate common tasks, such as setup/shutdown of test systems, perform configurations, create test data etc.
Inhaltsverzeichnis
- 1 Useful Operations of a Custom Menu
- 2 Defining a Custom Menu Operation
- 3 Debugging Custom Menu Operations
- 4 Useful Building Blocks for Custom Menu Operations
- 5 Organizing the Custom Menu
- 6 Getting a Separate Menu
- 7 Including Menu Operations from Imported Libraries
- 8 Asynchronous (Background) Actions
- 9 Killing (Background) Actions
- 10 Errors in a Menu Action
Useful Operations of a Custom Menu[Bearbeiten]
The following is a partial list of what can and has been done with this feature in the past (by customers):
- Startup / Shutdown of the System Under Test (usually actions which run shell scripts)
- Startup / Shutdown of Java Bridge connections
- Creation of test data files
- Creation of attachments in the item tree
- Extracting an attachment's contents and opening an external editor on it
- Opening a Java GUI on an attachment's contents via the Java Bridge
- Bulk generation of empty TestCase templates from an imported CSV file
- Starting mock/simulated services
- Load test specifications from a custom data base
- Upload results to a custom data base
Defining a Custom Menu Operation[Bearbeiten]
To add your own menu function, perform the following steps:
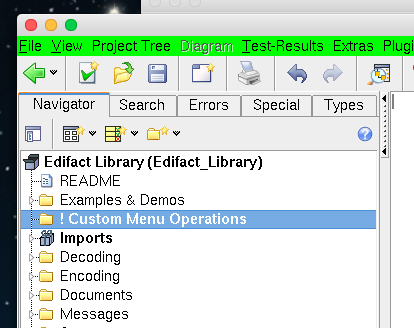
- create a folder in the left item tree and give it a useful name (such as "Custom Menu Functions")
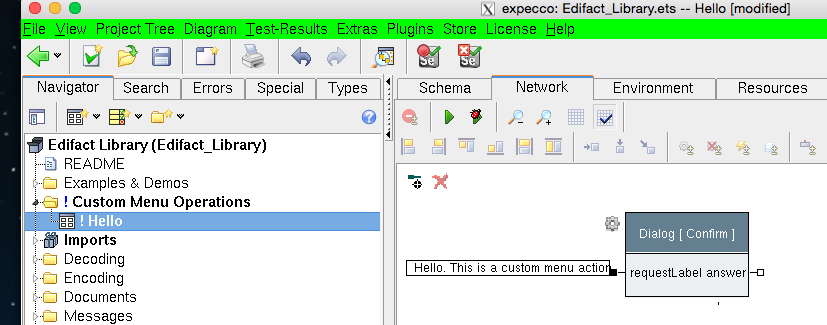
- create action blocks there. The blocks should not have any input pins. For a first example, simply create a compound action that opens a confirmation dialog.
- give the block a useful name - the name of the block will later be shown as the label of the menu item.
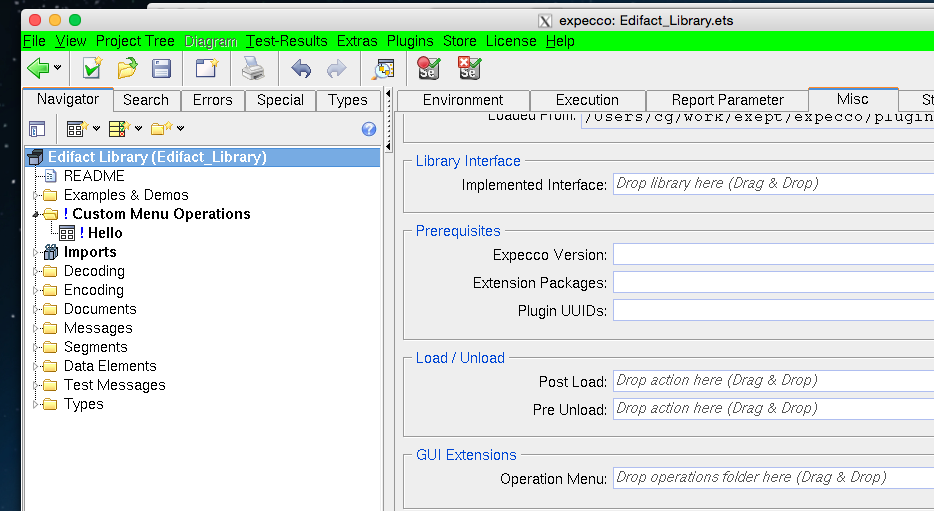
- navigate to the testsuite's "Misc" page
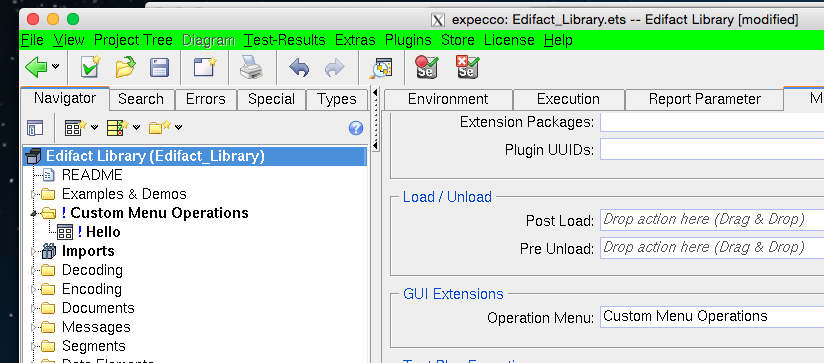
- drag the folder ("Custom Menu Operations") into the "GUI-Extensions" - "Operation Menu" field.
And "Accept" the change (click on "Accept").
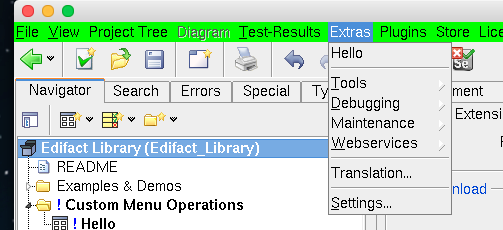
You are now ready to use the new operation; you will find a new menu item named "Hello" in the "Extras" menu:
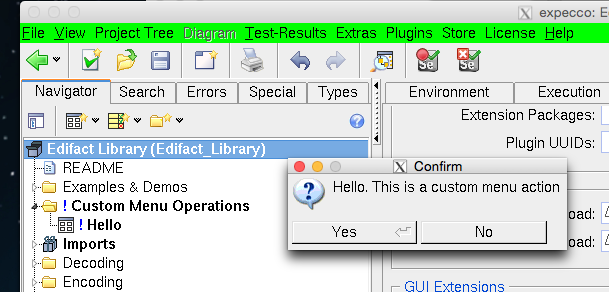
which, when selected, executes your "Hello" action:
Debugging Custom Menu Operations[Bearbeiten]
Custom menu functions are harder to debug than regular action blocks, because when executed, there is no test/demo page, in which an activity-log is shown. By default, if any error occurs inside the menu operation, it is simply cancelled and a short error message is shown in the lower information area. With release 23.1, this was changed to show a warn dialog, and an option to show the activity log (see below).
You can place a breakpoint in an elementary block and enable the "Debug all Exceptions" flag in the "Execution Settings".
You can also send trace messages to the Transcript or Stdout.
Sorry, but breakpoints on an activity step or single stepping are currently not allowed in menu actions.
We recommend to first test the action in a regular "Test/Demo" page.
Useful Building Blocks for Custom Menu Operations[Bearbeiten]
Because custom menu functions are used heavily by many customers, a library of useful operations ("Expecco Reflection Library") has been created and can be imported into your test suite.
This library contains many useful action blocks to interact with the running expecco itself. Many of which were inspired by concrete customer needs. You will find action blocks to get a handle to the current editor, to add items to the tree or current diagram, to fetch or modify the text being edited etc.
You will also find a few more examples in this library, for example on how to open an external editor on a selected attachment, and how to auto-generate complex activity blocks (which is useful to generate stub-testcases from an imported requirements list).
Example Using the Reflection Library: Edit Attachment in External Editor[Bearbeiten]
The following example action is found in the reflection library:
the corresponding menu function can be invoked while editing an activity diagram, with an attachment step being selected. (I.e. it saves the navigation to the attachment item, the click on the edit button, the click on accept in the attachment editor, and navigating back to the diagram). If that is a kind of operation that you have to perform many times per day, you will certainly appreciate that.
Organizing the Custom Menu[Bearbeiten]
By default, custom menu operations are shown in the "Extra Menu", one menu item per action block found in the folder. If the list becomes longer, it should be organized into a hierarchical list of submenu items.
For this, add sub-folders to the "Custom Menu Functions" folder, and group the operations as required. The custom menu will follow the folder structure.
Dummy action items named "-" and "=" will generate grouping lines to the menu.
Getting a Separate Menu[Bearbeiten]
If you prefer a separate "Operations" top-menu item, check the "In Top Menu" toggle, beside the operation folder field in the test suite's "Misc" page.
Then, custom operations get their own top-level menu and will not be shown in the "Extra" menu.
(notice that older expecco versions seem to have a little bug, in that the new top-level menu will only appear in new windows. There, you have to open a new window via the main menu, then close the previous window).
Including Menu Operations from Imported Libraries[Bearbeiten]
Check the toggle labelled "Include Imported Menus".
Asynchronous (Background) Actions[Bearbeiten]
By default, custom menu actions are blocking. This means that the expecco UI is not responding while the menu operation is being executed. This is OK for typical operations as listed above, but is inconvenient if the menu operation is itself a long time running operation.
It is especially inconvenient if the operation consists of a daemon process, for example to simulate a communication partner, a web service, a monitor or other task, which has to run in parallel with the test execution. For example, you may want to have a menu item to start a mockup service (e.g. HTTP or SOAP) for development of the test, but not when the suite runs in the production cycle.
Of course, it is always possibly to open another expecco window, and execute such an action in the second window, but this will lead to a number of blocked expecco windows being present (although it might be useful to see the activities execute there).
To make a custom operation execute in the background (i.e. in parallel) without a need for a second window, place an ampersand character ("&") behind the action's name (e.g. rename the action to something like "Start Foo &". Then, when selected via the menu, the action will be started as a background task, and expecco will immediately return from the menu action.
The background task will run until explicitly terminated via one of:
- the "Extras" → "Debugging" → "Stop all Executions" menu item,
- the "Extras" → "Debugging" → "Stop Background Menu Action" menu item,
- the process monitor, which is opened by the "Extras" → "Tools" → "Process Monitor" menu item.
If you load another test suite or close the browser window, with active background actions, two possible actions are taken by expecco:
- if there is another expecco window on the same test suite, the other window will "adopt" those background actions and behave as if they were started by it. You can then control them via its debugging menu.
- if no other window is open on the same suite, you will be asked if the background actions are to be terminated.
The process monitor ("Extras" - "Debugging" - "Process Monitor") will always show all background actions in the system - regardless from which window they were started. Therefore, in any case, these can always be terminated at any time via this tool.
Background actions are always terminated, when the last expecco window is closed (they are lightweight threads, and will not stay alive after the expecco session).
Killing (Background) Actions[Bearbeiten]
Either kill all Background actions via the "Extras" → "Debugging" → "Stop all Executions" menu item, or open a process monitor ("Extras" → "Debugging" → "Process Monitor"), find an individual background action's process in the list and terminate it there.
Errors in a Menu Action[Bearbeiten]
It is best to try any menu action first by executing it as usual, with all its debug- and logging features available. If it is a background menu action, make sure that it does not interfere with your test's interactions (e.g. by popping up a dialog at unexpected times, or by entering an endless loop).
Make sure that exceptions are handled gracefully, so that the action finishes with success.
If any unhandled exception happens (or it finishes with fail, error or inconclusive), a popup confirmation dialog is shown, offering a chance to see the activity log which lead to that situation. Of course, the amount of detail is under the control of any "skip in log" flags as set in steps and actions. And also under control of the global "ignore skip in log settings" flag, which is found in the user's settings ("Extras" - "Settings" - "Execution" - "Activity Log" - "Ignore Any Skip in Log").
