Test Execution Monitor Window/en
Inhaltsverzeichnis
Introduction[Bearbeiten]
Expecco can be configured to present a custom dynamic GUI (graphical user interface) while executing. This user interface is defined and controlled by the action being executed, and can vary (i.e. changed) dynamically. Useful scenarios for this are test stands, where you want to hide the internals of the execution from the test operator, or to present additional data (monitoring) or to ask interactively for parameters or other input values.
Of course, the simple dialog requests can also be used for parameter questions, but a custom UI can both provide a better look and allow for more complex user interaction to be defined.
The general mechanism is based on attaching a user interface to individual (compound) actions. This UI is then shown whenever the action is active.
Getting Started[Bearbeiten]
- First, create a new compound action, and go to its schema tab.
- at the bottom, find the button named "GUI" and click on it. A UI-editor will open, showing 3 views:
- the main view, containing the widget hierarchy and attributes,
- a drawing canvas, which shows how the UI will look
- and a widget gallery, from which UI elements can be dragged into the widget hierarchy to into the drawing canvas.
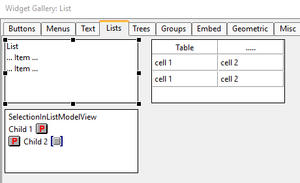
- now - for a simple example, drag a simple "OK" button (found in the "Buttons" section of the gallery) and a ListView (in the "Lists" section) from the gallery into the canvas. Don't care for layout details now - we'll fix this later.
- press the "Save" button in the main view and close the editor.
- the UI will later be shown during the action's execution; therefore, we make sure that it will run for some time. Place a simple "Delay for a few seconds" action into the action's activity diagram, so the UI will not be closed immediately.
- press "Run"
You will now probably get an error outcome, stating the the UI was disabled in the project 1). This is the default, and you should enable this first in the project's "Execution" tab: select "Window" in the combo list of the "User Interface" section near the bottom).
Run it again.
Your UI should now show up, while the compound action is active, and disappear later. Of course, we did not yet connect any data or callback actions with the UI's elements.
Keeping the UI open[Bearbeiten]
In the above setup, the actions network only contained a single Delay action. Thus, the network finished after the specified time. There are multiple possible setups to control when the UI should be closed, by controlling how long the action is active:
- by adding a "Wait Forever" action which gets cancelled after some time, or by a variable change
- by adding a "Finish with Success" action, which is triggered somehow
Typical GUIs will contain some button labelled "OK", "Accept" or "Save". This should be pressed by an operator, once all relevant fields have been filled with data, and the UI should be closed. For this,
- drag the button labelled "OK" from the gallery into the UI,
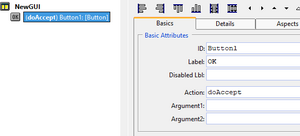
- change its label as desired (select the button in the widget hierarchy, and type the label into the "Label" field).
- (optionally) change the name of the "Action" variable, which defaults to "doAccept".
This is the name of the variable, which will get a value stored into, whenever the button is pressed. - if such a variable does not yet exist, pres the "create variable" icon beside the action name field (the yellow star icon)
- press save and close the GUI editor
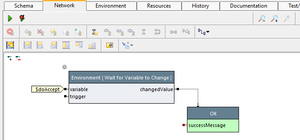
Now, your environment will contain another variable named "doAccept" (or whatever name you have chosen). Goto the network and add a new step "Wait for Variable to Change", and freeze its input from the "doAccept" variable. Make sure it has the autostart flag set, so it will start to execute whenever the UI action is triggered.
This action will wait for the given variable to change and whenever that happens, will send the variable's value to its output.
So this output can be used to trigger whatever is to be done after that GUI button press.
As a first experiment, let it trigger a "OK (Success)" action (which terminates the UI action).
Now, if you execute the UI action, its GUI will remain open until the "OK" button is clicked.
Notice that many other widgets will update a variable if configured to do so. For example, the List-Selection widgets or Textedit widgets will do so. By adding a "Wait for Change" step, input validations or other steps can be triggered inside your GUI actions network.
Connecting the Widgets with Data[Bearbeiten]
Widgets interact with the action via special environment variables. For example, the list-widget will present the list as held by a list variable and place the selection into another selection variable. These variables are to be defined in the action block's private environment, and should have the special initializer-type "GUI-Value" or "GUI-Action" (otherwise, the widget will not react to changes of the variable's value, only taking its initial contents as a constant).
Let's do this in our concrete example:
- reopen the UI-builder by selecting the schema tab and there clicking again on "Edit GUI" at the bottom
- from the gallery's "Lists" tab, drag a List widget either into the widget tree or in the drawing canvas view
- beside the widget tree, you'll find the selected widget's attributes, arranged in multiple tabs. Make sure the "Basics" tab is selected. There, enter the name of the variable which will hold the list, into the field named: 'List'. Press the "Create Variable" icon (the star) beside the name field.
- save and close the GUI editor
- provide some input to the list widget, by writing to the corresponding variable (in this case, "myList"). In the simple example here, the value comes from a freeze value containing multiple strings. In practive, this may come from a database, a file or an input pin to the GUI action.
1) why is it disabled by default?
We assume that the test suite will be executed automated once you finished developing it. And then, you will probably not want any popup windows to appear, which need user interaction (think of an automatic run overnight).
Instead of waiting for a never happening user input and thus blocking the machine for other scheduled automatic tests, the will instead report an error then ("User Interface Disabled") so that either the next test case will be executed, or the testplan be finished (and other automated tests can be executed afterwards).


