Compound Network Editor/en
The network editor is used to view and edit activity diagrams of compound blocks. It can be found on the "Network" tab after selecting a compound block in the navigation tree.
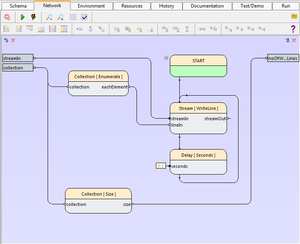
To the right, you see an example for an activity diagram in a network editor with the additional input (left) and output pins (right), which represent the pins of the edited block's schema.
Inhaltsverzeichnis
Buttons[Bearbeiten]
All functions described below are available through the popUp menu (right-click) in the editor. The menu is context sensitive. This means, that depending on the current selection, different menus are shown. Common functions are provided in an extra toolBar. These buttons duplicate corresponding functions from the context menus.
 Start a test run (of the edited Block only). This allows for a changed block's functionality to be checked immediately, without a need to create an extra compound block or a testplan-item for it to be executed. If the edited block needs input values or other prerequisite setup for the test run, these should be defined in the tab named "Test/Demo" (which is the rightmost tab of the editor).
 Scale up the size of the objects displayed in the diagram ("zoom-in"). There are three upward scaling steps above the normal display scale.
 Scale down the size of the objects displayed in the diagram ("zoom out"). There are three downward scaling steps below the normal display scale.
 Toggle the grid display. The grid is displayed as a field of dots that spans the complete diagram area. Displaying the grid is a purely visual assistance, and does not affect the functionality in any way.
 Toggle the automatic grid alignment. When turned on, all motions of steps or connection-edges, will be aligned to the grid, to give some constant gap stepping to the diagram.
 Align all selected steps to have the same ordinate for their left border. Does not resize steps.
 Align all selected steps to have the same ordinate for their right border. Does not resize steps.
 Align all selected steps to have the same ordinate for their top border. Does not resize steps.
 Align all selected steps to have the same ordinate for their bottom border. Does not resize steps.
 Align all selected steps to have the same ordinate for their right and left border. Steps are resized to match the first selected step's geometry.
 Align all selected steps to have the same ordinate for their top and bottom border. Steps are resized to match the first selected step's geometry.
 Align all selected steps along their vertical centerline. Steps are moved horizontally to be aligned to the first selected step's centerline.
 Align all selected steps along their horizontal centerline. Steps are moved vertically to be aligned to the first selected step's centerline.
 Spread all selected steps for equal horizontal spacing between them. The first and last selected steps are not moved, but define the overall area taken by the group.
 Spread all selected steps for equal vertical spacing between them. The first and last selected steps are not moved, but define the overall area taken by the group.
 Resize all selected steps to match the largest step within the selection.
 Resize all selected steps to match the smallest step within the selection.
 Increases all horizontal distances by the same factor. Dimensions are not changed. This effectively spreads all selected steps towards the right.
 Increases all vertical distances by the same factor. Dimensions are not changed. This effectively spreads all selected steps towards the bottom.
 Increases all distances by the same factor. Dimensions are not changed. This effectively spreads all selected steps towards the bottom-right edge.
 Toggle the "autostart"-property of the selected steps.
 Toggle the "ignore exceptions"-property of the selected steps.
 Toggle the "ignore in trace/log"-property of the selected steps.
 Toggle the enable input pin of the selected steps.
 Toggle the enable output pin of the selected steps.
 Interconnect the selected steps for sequential execution. The steps will be connected in the order they were selected.
Tasks[Bearbeiten]
Adding Steps[Bearbeiten]
When a block is dropped into a diagram, a so-called step is created. A rectangular box appears, which represents the newly created step. The step is initially selected, indicated by the red outline. (Selected items always appear outlined with the selection color, which is red by default, but can be changed in the settings.)
Usually, when creating steps, they are initially displayed with a red exclamation mark symbol to the top right of the representation box. This symbol indicates that the step (as it is currently set up) would not run when the diagram is executed. This is the case if the step has no triggering inputs connected, no direct trigger, and also no autostart flag activated. If nothing of those is the case, the step will be marked in this manner. It is usually (but not necessarily) not intended to have unconnected steps in a diagram (sometimes, you may leave them in a diagram for documentation purposes).
Steps can be added to the activity diagram either by drag & drop or via the popUp-menu.
To use drag&drop, drag one ore more items from a navigation tree and drop them into the network editor's display area. If multiple blocks are selected in the navigation tree, they can be dragged in one motion all together. Be aware that the navigation tree of the browser serves both as a source for drag AND to select the block to be edited. If you select and hold down the mouse button, this initiates a drag&drop operation. If you simply click and release the mouse button, this performs a select operation (and you may end up in another diagram). It is therefore sometimes difficult to use this one single tree as a drag source, and it is a therefore good idea to tear off a separate floating navigation tree. These floating windows do not affect the edited-block selection.
To use the popUp-menu, select one of the "New Step" items. You can either have an existing action block placed ("existing action") or create a new action. If an existing action is choosen, a dialog pops up, asking for the type of action to add. For new actions, a corresponding new item is automatically created as empty action in the left navigation tree.
A very useful function is "Place New Step and Connect" (new in rel1.7). This is enabled if you have a number of pins of existing steps already selected, and will offer a list of matching steps that are useful with that pin selection (i.e. the number of pins and their datatypes must match).
All of the menu-initiated step creation functions allow for the action to be choosen from a filtered list of available actions. The filter operates by looking at the name and tag(s) of the actions. If multiple filtering words are entered (separated by semicolons), only actions which contain ALL of those string match patterns will be shown. For example, to get a list of all selenium actions which deal with text validation, enter a filter string like "selenium;text".
Selecting Steps[Bearbeiten]
Steps can be selected by left-clicking on it. Additional steps are selected by holding down the Shift-key in conjunction to the left mouse button. In a similar way, pressing the Control-key (CTRL or STRG) toggles steps into or out of the selection.
Another possibility to select multiple steps at a time is to mark a selection rectangle area with the mouse, which selects all steps (and other elements) that are within that area.
Finally, pressing CTRL-a selects all elements of the diagramm. This is useful to shift the whole diagram within the page (to make more space at the top, for example).
Arranging Steps[Bearbeiten]
To move steps to a different location, you can click on it, hold the button, and move it with the mouse. While moving, an equally sized shadow box shows where the new position would be. Selected steps can also be moved via the curosr keys.
If the clicked step was not selected yet when picking it, it will be selected and moved solely. If, on the other hand, the clicked step was part of a current multiselection, the whole selection is picked and moved, including all connections between them.
When you place steps outside the current diagram boundaries, these will automatically be extended to fit the new position of the moved steps.
Additional arrangement-functions (spreading, aligning etc.) are found in the context-menu and the toolbar menu.
Interconnecting Pins[Bearbeiten]
Steps exchange data and control information via connected pins. In principle, you can only connect output pins to input pins, because the intention of a connection is to pass output values from an output to an input. However, an attempt to connect two outputs lets the editor search for the corresponding input pin and create a valid input-output connection.
To create a connection, click on one of the two pins you want to interconnect, keep the mouse button pressed, and move the mouse to the other pin. To keep track of what you do, a rubber-band line is drawn from the starting pin to your mouse position. The mouse-symbol is changed to a "thumb-down" while over an invalid target pin. When you release the mouse button over a valid target pin, a rectangular connection will automatically be created. If the target pin is not suitable for the operation, no connection is created.
Note that interconnecting pins underlies certain restrictions:
- You cannot connect an output pin to another output pin, nor an input pin to another input pin (1).
- Inside the network, the roles of the compound actions input/output pins are reversed (i.e. the compound's input pins a treated like outputs inside the network).
- You can only interconnect input and output pins that have compatible datatypes. Usually, you interconnect pins of the same data type, or to a related data type, like an integer output to a float input. An input pin with the "any" data type can be interconnected to any other pin, but not vice versa; an "any" output pin can only be connected to another "any" input pin, unless you add a cast or conversion step in between (2).
You are not bound to the wiring arrangement as it is created automatically. Instead, you can click on a connection to select it, and then move each of its edges individually to a different ordinate. However, the connections will be automatically laid out again when you move or substitute a step which is involved in this connection.
To transpose an edge, left-click on the edge, hold the button down, and then drag the edge to the desired position. During motion, a ghost line is drawn to keep track of what you are doing.
You can also add new edges to the connection, by selecting it, right-clicking the edge into which a new angle branch shall be inserted, and the choosing the "Split Connection" option from the context menu.
There is one more special display mode for connections: If a connection already exists, but a later data type change to either the input or the output pin violates the data type compatibility of the connection, the connection will be drawn as a dotted line. It can be edited like before, but remains deactivated until the data type compatibility is restored in any valid manner.
(1) this has been somewhat relaxed in the 1.7.2 release: if you try to connect two inputs, the connection will be done to the already connected output. This makes it easier to place and connect more actions to an existing output if the diagram is big and the output is far away.
(2) starting with the 1.7.3 release, an "unsave" connection can be created by pressing the CTRL-key during the connect. This creates a non-typesave connection. Use this with care, for a temporary workaround, until either a pin's type has been changed, or an appropriate converter has been added.
Indicators[Bearbeiten]
 The step has the autoexec option flag set. The step will start even without a triggering input. This flag is required for steps of which all pins are non-triggering (for example, because they are "frozen" to fix values), or to steps which have no input pin at all.
 Shown for skipped steps. Skipping steps is often useful during test-development, to sskip over either unfinished actions, or when proceeding development after a change, to skip over already executed steps. When the test goes into production, however, all skip-flags should be removed.
 Shown for steps which fork a new activity for every incoming set of values. If this flag is not set, incoming values are remembered in the steps input baskets, and will be processed sequentially. Notice that in releases prior to 1.9, the default execution mode was "parallel" and the user had to change this to "sequential" via an explicit menu action. Starting with 1.9, the default when placing new steps is now "sequential". Therefore, when you load old test-suites into a post-1.9 expecco editor, you will see these indicators all over the place.
 The step has a breakpoint set. When reached during a test run, the executir will pause and wait for either the "Run/Continue" or the "Single-Step" button tp be pressed.
Common Options (Context Menu)[Bearbeiten]
When nothing is selected in the editor:
- Undo
Allows you to undo previous editing steps. The list of undoable operations is cleared as soon as you apply your changes (by pressing the accept button). Once accepted, only major changes can be undone via the global undo function, which restores the previously accepted version(s).
- Cut, Copy, and Paste
These commands are valid for all selectable items. They appear in other context menus when applicable.
- New Text Annotation
This option creates a new textual annotation.
- New Legend
This option creates a legend, which is a text-annotation with info-macro (see annotation).
- New Image Annotation
This option creates a new image annotation.
- New Step
This option allows the quick creation of steps. When selected, a dialog appears to specify the type of action. Then, specify the position by moving the mouse to the desired upper-left corner.
- Recompute all Connections
This option recomputes of all connections in the diagram (routing algorithm).
Step Specific Options (Context Menu)[Bearbeiten]
When one or more steps are selected in the editor:
- Rename
This option allows to rename the selected step. Selecting it opens a text input field at the top of the step's representation box.
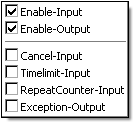
- Special Pins
This submenu allows adding special pins for the selected step. For more information see: Pin
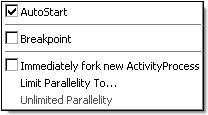
- Execution
This submenu provides several execution related options. Its functions include the switching of special trigger types, parallelism settings, and execution modes.
- Autostart
This checkbox allows to switch the autostart mode on or off. Steps with this option on are started automatically each time the workflow is executed. You can recognize them by the yellow flash symbol on the top left of the step's representation box.
- Autostart
- Sequential Execution
This option interconnects the selected steps for sequential execution. The steps will be connected in the order they were selected.
- Sequential Execution
- Breakpoint
This checkbox allows to set or remove a breakpoint for the selected step.
- Breakpoint
- Immediately fork new ActivityProcess
This checkbox serves to switch the activity prefork mode on or off. When this option is checked, an activity will be pre-forked as soon as one of the triggering inputs gets a value. To show that prefork mode is on, a parallelism symbol is displayed to the top right of the step's representation box, but only if there is at least one triggering input pin or a direct trigger pin connected, or autostart activated.
- Immediately fork new ActivityProcess
- Limit Parallelity To...
This option is used to adjust a maximum number for the activities executed in parallel. When selected, a dialog box opens up, asking to input the maximum number.
Initially, no limit is set. If a limit is specified in the dialog, the number appears to the top right of the step's representation box, but only if there is at least one triggering input pin or a direct trigger pin connected, or autostart activated.
- Limit Parallelity To...
- Unlimited Paralelity
This option is the counterpart to the 'Limit Parallelity To...' option. It is only available when a limit is adjusted for the selected step, and annuls this limitation.
- Unlimited Paralelity
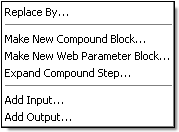
- Operations
This submenu provides several options for step substitutions. This includes replacing, substituting and expanding of single steps or compounds of steps.
- Replace By...
This option replaces an existing step within the current diagram by a substitute step of a block to be chosen. To chose the substitute block, a dialog containing a selection list is opened, showing either all blocks available in the testsuite, or only those which pins numbers are the same as that of the block to be substituted. This can be switched with the dialog's button which accordingly displays either "Blocks with same Number of Pins ..." or "All Blocks ...".
If the substitute step has less pins on a side than the one to be substituted, existing connections are kept only up to the number of pins of the new step. Connections between newly incompatible pin types are also lost.
- Replace By...
- Make New Compound Block...
This option allows to replace whole compounds of the diagram by an automatically generated new compound block, which then contains all the steps that were selected, when necessary creating additional input and output pins to keep the wiring semantics unaffected.
- Make New Compound Block...
- Make New Web Parameter Block...
This option allows to replace whole compounds of the diagram by an automatically generated new web parameter block, which then contains all the steps that were selected and has a special pin to read parameters from for example a csv file. This can be useful e.g. to fill in form.
- Make New Web Parameter Block...
- Expand Compound Step...
This option is kind of the counterpart to the previously described 'Make New Compound Block ...' option. It duplicates all internal Steps inside the selected Step's Internal Network, and inserts the complete duplicate set in the left area of the Workflow Editor's view. I t does not only duplicate the Steps, but also the wiring, and the Step's attributes (triggers, pin settings, execution settings etc.). The selection changes upon the inserted Steps, so they can be moved to a fitting location collectively.
- Expand Compound Step...
- Add Input...
This option allows the creation of additional input pins for the selected step. You will be asked to enter a name and a data type for the new pin.
- Add Input...
- Add Output...
This option allows the creation of additional output pins for the selected step. You will be asked to enter a name and a data type for the new pin.
- Add Output...
- Attributes...
This option allows to change different attributes like the color for single steps.
- References...
This option shows all references on the selected step. For example its block description.
- Add Extra Page on Selected Item
Pin Specific Options (Context Menu)[Bearbeiten]
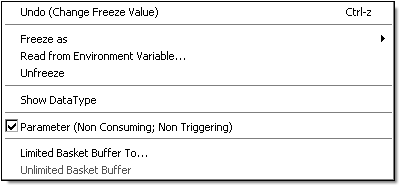
When an input pin is selected in the editor:
- Freeze (as)
This option applies to all data input pins and trigger Input pins, except for the cancel pin. The identifier of the data type in the menu entry differs depending on the data type of the pin. It allows, for most standard data types, presetting the input value according to the data type, by typing a valid value into a text input field.
- Read from Environment Variable...
This option applies to all data input and some trigger input pins. The option is only available if the selected pin is not connected to any value delivering output pin. Selecting this option causes a dialog to open up, allowing specifying the environment variable's name in a text input field. For more information see: Environment Freeze Value
- Unfreeze
This option applies to all data input and trigger input pins, but is only available if the selected pin is frozen to a value or to an environment variable. No matter if the pin was preset with a direct value or with an environment variable, the preset information will be lost, and the pin is connectable to adequate output pins again.
- Show Datatype
This option opens a view which shows the pins data type.
- Parameter
This checkbox applies to data input pins only. If checked, the pin will not be comprised in the triggering function for the data input pins. For more information see: Input Pin
- Limit Basket Buffer To...
This option applies to all data input pins. Selecting this option causes a dialog to open up, allowing specifying the (integer) maximum number of values that the pin should keep in a buffer before suspending subsequent value delivering activities. After entering a valid number and confirming with "OK", the pin is limited to that number, which is indicated by displaying the number to the left top of the pin, as depicted to the right.
- Unlimited Basket Buffer
This option applies to all data input pins, but only appears if the selected pin has a basket buffer limit set. In this case, selecting this option will clear the limit, and the pin appears without a limit indication again.
When an output pin is selected in the editor:
- Buffered
This checkbox applies to data output pins only. It serves to switch the buffering mode of the pin on or off. For more information see: Output Pin
Connection Specific Options (Context Menu)[Bearbeiten]
When a connection is selected in the editor:
- Disconnect
This option simply removes the connection.
- Recompute Connection
This option initiates an automatic re-layout of the connection's edges. There is no guarantee that this will meet your expectations. However, trying it is low risk, because the change can be immediately undone with the "Undo" option.
- Split Segment
This option causes the selected connection to split into multiple parts. By this, you get four additional edges which are each individually transposable.
- Join Segments
This option is the counterpart for the "Split Segments" option. It joins previously split connections.
- Arrow
This checkbox allows to switch arrows on and off which help to keep track of the connection's direction.
- Disable TypeCheck (force Valid)
This option disables the type check. So every input pin can be connected with any output pin regardless of their datatypes.
For other editors see: Editors
The full online documentation can be found under: Online Documentation
