AndroidPlugin Reference/en: Unterschied zwischen den Versionen
Sv (Diskussion | Beiträge) |
K (Spelling fixes.) |
||
| Zeile 1: | Zeile 1: | ||
'''The Android-Plugin is obsolete starting with |
'''The Android-Plugin is obsolete starting with expecco 2.10. Please refer to [[Mobile Testing Plugin]]''' |
||
| Zeile 34: | Zeile 34: | ||
which has a similar GUI and comparable functionality to the Android Plugin. |
which has a similar GUI and comparable functionality to the Android Plugin. |
||
The Android plugin is based on the [[Java Interface Library | Java Interface Library ("Java Bridge")]] and provides all of its features. For details about how to access |
The Android plugin is based on the [[Java Interface Library | Java Interface Library ("Java Bridge")]] and provides all of its features. For details about how to access Java objects and classes inside the mobile device, take a look at the "[[Java Interface Library]]" reference page. |
||
==System Requirements== |
==System Requirements== |
||
| Zeile 88: | Zeile 88: | ||
# Select the device in the list and click "Start" |
# Select the device in the list and click "Start" |
||
# At the next dialog click "Launch" |
# At the next dialog click "Launch" |
||
# It takes some time for the emulator to start the device. Wait until the emulator has completed the startup. It is ready, when a standard telephone-home screen |
# It takes some time for the emulator to start the device. Wait until the emulator has completed the startup. It is ready, when a standard telephone-home screen appears. |
||
# Occasionally a display guard is active, locking the screen. Make sure that this guard is deactivated (on most Android versions, you have to drag some GUI-element out of the screen to do that). |
# Occasionally a display guard is active, locking the screen. Make sure that this guard is deactivated (on most Android versions, you have to drag some GUI-element out of the screen to do that). |
||
# Eventually, your emulator screen should look similar to: |
# Eventually, your emulator screen should look similar to: |
||
| Zeile 94: | Zeile 94: | ||
[[Datei:AndroidEmulatorReady1.png]] |
[[Datei:AndroidEmulatorReady1.png]] |
||
===Loading the Software to be Tested onto the Device ( |
===Loading the Software to be Tested onto the Device (Deployment)=== |
||
In expecco, open the "Android Deployment Tool" found in the "Plugin"->"Android" menu. |
In expecco, open the "Android Deployment Tool" found in the "Plugin"->"Android" menu. |
||
The following dialog has to be filled: |
The following dialog has to be filled: |
||
| Zeile 147: | Zeile 147: | ||
==Creating Tests== |
==Creating Tests== |
||
This will demonstrate how to create a very |
This will demonstrate how to create a very simple and small testcase, assuming the application is already deployed as shown above with the default demo settings. The test will send some event to the device and readout a widget's text contents. |
||
Notice, that once you have created this action, it can be reused in whatever test-scenario a similar event is required. |
Notice, that once you have created this action, it can be reused in whatever test-scenario a similar event is required. |
||
Also, notice that although hard-coded values are used in the following example for the widget- and device IDs, these would be parametrized either via the variable-environment, or by passing those values as input-pin to the action block. |
Also, notice that although hard-coded values are used in the following example for the widget- and device IDs, these would be parametrized either via the variable-environment, or by passing those values as input-pin to the action block. |
||
| Zeile 175: | Zeile 175: | ||
====Fetching Data from an Android Widget==== |
====Fetching Data from an Android Widget==== |
||
# Next, let |
# Next, let us fetch the text from an item of the Android menu: from the "Android Library"->"Text" folder, drag and drop the "Get the text of a view"-block into the network of our block. |
||
# Add an "enable-Output" pin to the "press MENU" block, and connect it to the new "get the text of a view" block's "Enable Input", to make them execute sequentially (if you don't know yet, how to do this, please take a look at our introductionary how-to document). |
# Add an "enable-Output" pin to the "press MENU" block, and connect it to the new "get the text of a view" block's "Enable Input", to make them execute sequentially (if you don't know yet, how to do this, please take a look at our introductionary how-to document). |
||
# Now connect the input-pins of the "get the text of a view": copy the input of the "bridgeID" from the "press MENU" block and paste it to the "bridgeID" input-pin of the "get the text of a view" |
# Now connect the input-pins of the "get the text of a view": copy the input of the "bridgeID" from the "press MENU" block and paste it to the "bridgeID" input-pin of the "get the text of a view" |
||
# For the "view path" input, use the browser again. Because the root of the device's widget hierarchy has changed (the menu is now on top of the screen), we |
# For the "view path" input, use the browser again. Because the root of the device's widget hierarchy has changed (the menu is now on top of the screen), we have to refresh the tree first ("Android Browser"->"Refresh Browser Tree"). |
||
# Expand the tree to find the "IconMenuItemView" node, then right-click on it to open the popup-menu |
# Expand the tree to find the "IconMenuItemView" node, then right-click on it to open the popup-menu |
||
# Select "Verify Path" and copy the shown path. |
# Select "Verify Path" and copy the shown path. |
||
| Zeile 187: | Zeile 187: | ||
# On the device/emulator, use the back button to close the menu. |
# On the device/emulator, use the back button to close the menu. |
||
# Now, execute the action block again, by pressing the green "Run Test" arrow. The |
# Now, execute the action block again, by pressing the green "Run Test" arrow. The Android-menu will open again and the text is retrieved. |
||
# To view the text expand the execution tree and select the "get the text of a view" node. Then select the "Pins" tab |
# To view the text expand the execution tree and select the "get the text of a view" node. Then select the "Pins" tab |
||
# At the right you see the output-pins one of them is the text pin and data displays its value which now should be "Add note" |
# At the right you see the output-pins one of them is the text pin and data displays its value which now should be "Add note" |
||
Version vom 18. Mai 2017, 14:46 Uhr
The Android-Plugin is obsolete starting with expecco 2.10. Please refer to Mobile Testing Plugin
Inhaltsverzeichnis
Introduction[Bearbeiten]
The Android-Plugin for expecco provides abilities to automate tests which include interaction with Android GUIs. This includes simple single-device GUI tests as well as more advanced end-to-end tests, which incorporate possibly multiple mobile devices, webservices, databases and other hardware. The expecco add-on package consists of
- an expecco executable block library, to easily model and execute tests with expecco,
- tools which help the test modeler to develop tests, sign and deploy and to explore the application's components.
Tests can be executed on real devices or on the android emulator. The Android library is expandable and customizable to fit the application and its custom views.
Features[Bearbeiten]
- Automated GUI tests on Android-Systems
- Execute tests on real devices or the emulator
- Simulate user interaction
- Simulate events
- Can test (controlled from a single expecco test system):
- Parallel test execution on multiple devices
- Interaction between devices
- Interaction of devices with a web-application
- Interaction of devices with hardware or databases
- Automated deployment
- Object based test execution
- No source code modification needed
- Test the installable, build and signed application
- Includes support-tools for test development, deployment and application exploration (widget browser)
Related Information[Bearbeiten]
For more details see the "Java Swing GUI Access Library and Plugin - Browser descriptions", which has a similar GUI and comparable functionality to the Android Plugin.
The Android plugin is based on the Java Interface Library ("Java Bridge") and provides all of its features. For details about how to access Java objects and classes inside the mobile device, take a look at the "Java Interface Library" reference page.
System Requirements[Bearbeiten]
Before we can start the test execution, we need an Android device to run the test on it. We can use an Android emulator (recommended) or a real Android device.
Required Software[Bearbeiten]
- JDK1.5
- Android SDK (Includes an Android emulator)
- USB drivers for your mobile device (Not required for the emulator)
download instructions below.
Supported Android Versions[Bearbeiten]
We recommend the use of at least a 2.0 version. However the Android testing plugin has been used with 1.5, 1.6, 2.0, 2.1, 2.2 and 2.3.
Supported Hardware[Bearbeiten]
Setup[Bearbeiten]
Hardware Setup[Bearbeiten]
To use a real device perform following steps:
- On your device, navigate to "Settings"->"Applications"->"Development" and enable "USB-Debugging".
- Also at "Settings"->"Applications", enable "Unknown Sources" to allow the installation of non market applications.
- Connect your device via USB to your PC.
- The USB driver of your device must be installed on the system. Some manufactures deliver their own USB driver, other provide them on their web page.
- If your device is asking for the type of USB connection, select "Charge only".
- On the device, WLAN must be enabled and your PC and the device must be in the same network.
Emulator Setup[Bearbeiten]
To start an emulator do the following steps (Windows version):
- If you do not have the Android SDK already installed,
- open your browser, navigate to http://developer.android.com/sdk/index.html
- Download the SDK for Windows (.exe recommended) and follow the installation instructions.
- You may need to install a Java Development Kit (JDK) first. The exe-installer will inform you, if you need to install a JDK (Notice, that for JDK installation, administration rights will be required).
- Start the "Android SDK and AVD Manager" tool, if not already running.
- On Windows, you can start the "SDK Manager.exe", which is located in the Android SDK folder. Or start the SDK Manager from the start menu.
- After the first start, a dialog asks you to choose which packages to install:
- You do not need to install all packages (this would take a long time).
- Reject all except "SDK Platform Android 2.2, API 8, revision 2" and "Android SDK Platform-tools, revision 2".
- Now click on "Install".
- A download and install process will start.
- After the install finished, you will propably be asked if you want to restart ADB. Select "yes" and close the install window.
- Now select "Virtual devices"
- Click "New..." and enter the name for the device you want to create.
- From the target dropdown-list, select "Android 2.2 - API Level 8
- For the SD card size, set a size of at least 32 MiB (?)
- Now click "Create AVD" and confirm the following "Result of creation..." information dialog
- Select the device in the list and click "Start"
- At the next dialog click "Launch"
- It takes some time for the emulator to start the device. Wait until the emulator has completed the startup. It is ready, when a standard telephone-home screen appears.
- Occasionally a display guard is active, locking the screen. Make sure that this guard is deactivated (on most Android versions, you have to drag some GUI-element out of the screen to do that).
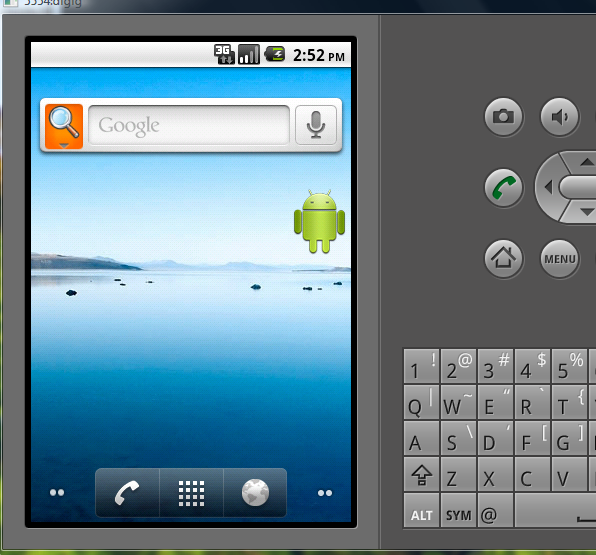
- Eventually, your emulator screen should look similar to:
Loading the Software to be Tested onto the Device (Deployment)[Bearbeiten]
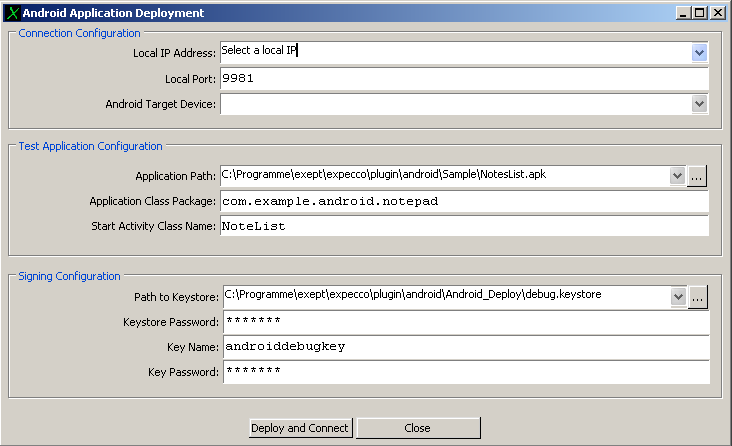
In expecco, open the "Android Deployment Tool" found in the "Plugin"->"Android" menu. The following dialog has to be filled:
Connection Configuration[Bearbeiten]
The "Local IP Address" must contain the IP address of the machine on which expecco is running (i.e. your own address). Select one from the list.
The "Local Port" contains the port number of an expecco debug-connection port to which the Android device connects. The default "9981" is usually ok, unless that port is alread in use by another program.
Choose the name of your device in the "Android Target Device" field. For the emulator, this will be a name like "emulator-xxxx", for a real device, it will be the manufactorer's id.
Application Configuration[Bearbeiten]
"Application Path" must contain the path to the packaged android application (apk-file).
"Application Class Package" must be the namespace, and "Start Activity Class Name" the application's start class name. These two are defined by the application developer.
Signature Configuration[Bearbeiten]
This box contains information about the location of the keystore, which contains the cryptograhic keys to sign Android applications. You can deploy either an originally unsigned apk-package, which will be signed using the default signing key. Otherwise, if the application is already signed, you have to enter the path to the keystore which signed the app, the keyname and password.
Running Tests[Bearbeiten]
Before running any test, you have to ensure that the application has been deployed onto the device. This can be done manually as described above, by using the Deployment Dialog.
However, it can also be done automatically by expecco whenever the test is started, or, if you use a project-postLoad action, whenever the testSuite is loaded. You will find deployment action blocks in the Android Library and an example for its use in the Android demo test-suite.
To run the demo-test[Bearbeiten]
The test-suite provided as a sample is found in the distribution media, or alternatively on the example-suites page [1].
To run this example,
- Open the suite either via the menu, or by clicking on the test-suite file, or by clicking on the suite in the web-browser.
- Navigate to the testPlan named "My NoteList TestPlan" (in the tree on the left side).
- Press the "Run"-button (green arrow) to start the testplan.
- When started for the first time, a pre-execute action will automatically deploy the application to the device.
- If your machine is reachable via multiple ip addresses, a dialog will be shown before the deploy starts.
- Select the one IP from the dropdown-list, which is also in the same subnet as the mobile device (and therefore reachable). Normaly you will only have a single IP, and this dialog is not shown.
- Select the Android device or emulator from the second dropdown-list. If you have only one device/emulator, this list is not shown.
- If no Android device was found, check for problems with the USB connection. Also check your drivers and make sure USB debugging is enabled.
Creating Tests[Bearbeiten]
This will demonstrate how to create a very simple and small testcase, assuming the application is already deployed as shown above with the default demo settings. The test will send some event to the device and readout a widget's text contents. Notice, that once you have created this action, it can be reused in whatever test-scenario a similar event is required. Also, notice that although hard-coded values are used in the following example for the widget- and device IDs, these would be parametrized either via the variable-environment, or by passing those values as input-pin to the action block.
Preparation[Bearbeiten]
- Create a new test-suite (menu: "File"->"New Testsuite")
- Import the Android library (menu: "File" -> "Import Library..."
- from the list of libraries, select "AndroidLibrary.ets"
Creating a "Simulate Keyboard Event" Action[Bearbeiten]
- Create an action "block". Right-click on the project, select "New Block"->"Compound"
- The new block's "Schema" tab is shown. Navigate to the "Network" tab, next to it.
- In the project tree, expand the "Imports" folder, expand the "Android Library" and expand the "Actions"->"Key Inputs" folder
- Drag and drop the "press MENU" block into the network of our new block's network (you may want to tear off an extra tree-view, to have the drag-source tree separate from the target selection tree. This makes drag&drop much easier)
- The dropped block has three unconnected input pins. Right-click on the first, and choose the "Freeze as String" option.
- Type the IP-address that you used for the deploy, followed by "_" (underscore), followed by the deploy-port-nr. Together it should look similar to '192.168.0.234_9981'. This specifies the device, on which the event is simulated. Notice, that here, the IP address is somewhat hard-coded. In a real test, this would be placed into the top-level variable environment. Also notice, that this is how multiple events are sent to multiple devices in a social-network simulation scenario.
Using the Component Browser to look into the Application's Widget Tree[Bearbeiten]
- The "viewPath" input pin needs to get the XPath of the GUI-element inside the Android application, which shall receive the event. To explore the widget tree inside the application, use the "Android Browser". This browser is started after the deployment. (If you closed it, you can reopen it at any time later, via at "Plugins"->"Android"->"Open Android Component Browser" menu item). Then, wait for the device to connect ("Android Browser"->"Wait for an Android System Connecting"). A confirmation dialog will appear, showing the IP-address and the port-nr of the incoming connection. Make sure, this is the same as the one used during the deploy and press "Wait for connect". Now the tree of the GUI elements should be shown.
- In the browser, select the root element and from the right-button popup-menu, select "Verify Path".
- Copy the shown path and close the dialog
- Go back to the block network, right-click on the viewPath-pin and select "Freeze as String". Paste the copied path into the box.
Running the Event-Generator Block stand-alone[Bearbeiten]
- Now press the green arrow to start this block. The menu of the application on the Android device or emulator will now open.
Fetching Data from an Android Widget[Bearbeiten]
- Next, let us fetch the text from an item of the Android menu: from the "Android Library"->"Text" folder, drag and drop the "Get the text of a view"-block into the network of our block.
- Add an "enable-Output" pin to the "press MENU" block, and connect it to the new "get the text of a view" block's "Enable Input", to make them execute sequentially (if you don't know yet, how to do this, please take a look at our introductionary how-to document).
- Now connect the input-pins of the "get the text of a view": copy the input of the "bridgeID" from the "press MENU" block and paste it to the "bridgeID" input-pin of the "get the text of a view"
- For the "view path" input, use the browser again. Because the root of the device's widget hierarchy has changed (the menu is now on top of the screen), we have to refresh the tree first ("Android Browser"->"Refresh Browser Tree").
- Expand the tree to find the "IconMenuItemView" node, then right-click on it to open the popup-menu
- Select "Verify Path" and copy the shown path.
- Paste the path as freeze-value of the "viewPath"-pin of the "get the text of a view" block
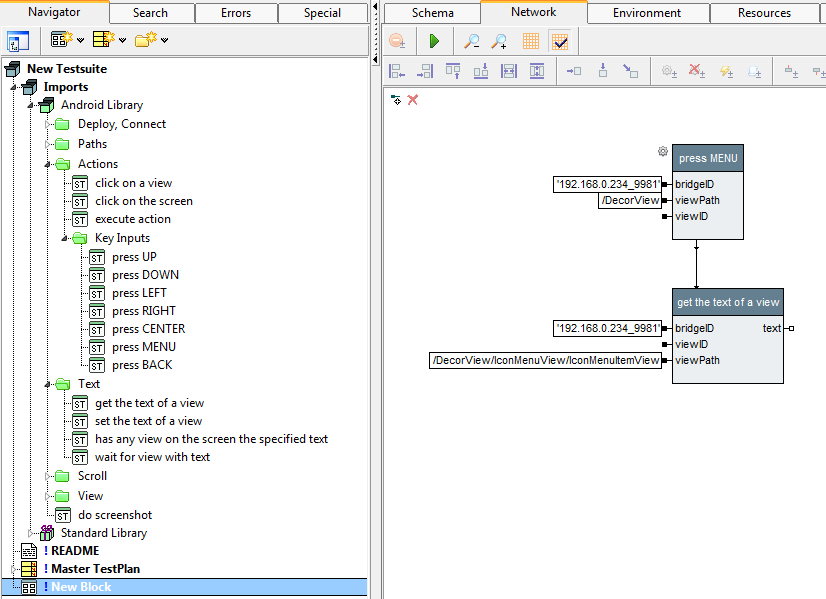
Your screen should look like this:

- On the device/emulator, use the back button to close the menu.
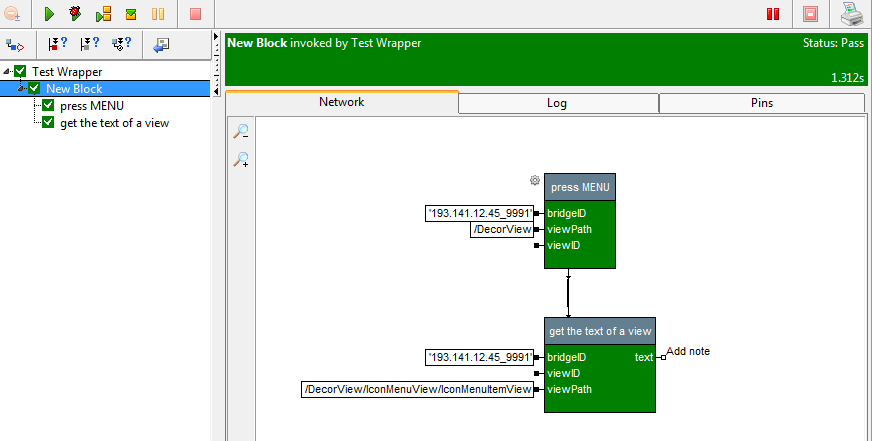
- Now, execute the action block again, by pressing the green "Run Test" arrow. The Android-menu will open again and the text is retrieved.
- To view the text expand the execution tree and select the "get the text of a view" node. Then select the "Pins" tab
- At the right you see the output-pins one of them is the text pin and data displays its value which now should be "Add note"


