Selenium Web Test Plugin/en: Unterschied zwischen den Versionen
Cg (Diskussion | Beiträge) |
Cg (Diskussion | Beiträge) |
||
| (Eine dazwischenliegende Version desselben Benutzers wird nicht angezeigt) | |||
| Zeile 1: | Zeile 1: | ||
== Attention == |
== Attention == |
||
The "''Selenium Plugin''" as described in this document has been |
The "''Selenium Plugin''" as described in this document has been obsoleted in vsn18.1 by the [[Selenium WebDriver Plugin/en|Selenium WebDriver Plugin]], which uses the webDriver-protocol. This change was required first because the SeleniumRC / SeleniumIDE interfaces which were used previously are no longer supported by newer browser versions, and second because many more UI technologies can be controlled by this protocol. |
||
This old library can still be used, but it is highly recommended that you migrate to the new version. |
|||
If required, you can continue using this plugin, as long as you use an older browser for your tests. Hints for migration to the new webDriver interfaces are found in the documentation of the new [[Selenium WebDriver Plugin/en | Selenium WebDriver Plugin]]. |
If required, you can continue using this plugin, as long as you use an older browser for your tests. Hints for migration to the new webDriver interfaces are found in the documentation of the new [[Selenium WebDriver Plugin/en | Selenium WebDriver Plugin]]. |
||
Aktuelle Version vom 1. Oktober 2020, 21:58 Uhr
Inhaltsverzeichnis
Attention[Bearbeiten]
The "Selenium Plugin" as described in this document has been obsoleted in vsn18.1 by the Selenium WebDriver Plugin, which uses the webDriver-protocol. This change was required first because the SeleniumRC / SeleniumIDE interfaces which were used previously are no longer supported by newer browser versions, and second because many more UI technologies can be controlled by this protocol. This old library can still be used, but it is highly recommended that you migrate to the new version.
If required, you can continue using this plugin, as long as you use an older browser for your tests. Hints for migration to the new webDriver interfaces are found in the documentation of the new Selenium WebDriver Plugin.
Introduction[Bearbeiten]
The "Selenium Plugin" adds an interface to the open-source Selenium web testing framework. It allows for capture/replay/driving of web sessions. It uses an extended Firefox browser (and Selenium IDE) for capture and can use any other browser (and Selenium RC) for replay/driving. When capturing a browser session, user interactions and page contents validation steps are imported as steps of an activity diagram, which can be immediately replayed, or edited and refactored to be integrated into other scenarios.
The Selenium Library wraps all Selenium functions as graphical building blocks in expecco. Thus, instead of using selenium in a textual and script-like fashion, these can now be modeled as a graphical diagram. Captured browser sessions are imported as activity diagrams of the recorded interaction steps, and further reused, re-factored or parametrized in the expecco diagram editor. It is especially possible and useful, to provide input values from other sources (databases, testdata generators etc.) or to further validate the system using direct access blocks to the database or via other access paths. In addition, partial interaction sequences can be resused, parametrized, or used in loops or alternative sequences.
Notice that simple replay of a previous recording is usually not sufficient for testing. Typically, parameter values must be chosen and applied dynamically. Also, in many test scenarios, the structure of the page may be different from what has been recorded. For example, a list may contain additional lines or columns, pages need to scrolled or forward-clicked, in a way, which often needs to be determined dynamically, at the time of the test run, not when the test was created.
The combination of Selenium commands (and wrapping them as Expecco-blocks) with Expecco's abilities to dynamically change the execution behavior (if- and loop constructs) makes this a perfect tool for the test of complex and dynamic web applications. The full power of expecco's rich control flow options is now combined with the Selenium testing features.
Summary of Features[Bearbeiten]
- Model based test development combined with capture & replay
- Plays browser based web scenarios with most commonly used browsers
- recording of browser interaction using Mozilla Firefox
- Easy construction of new user action blocks
- Easy parametrization of web forms and generation of CSV input value tables
- Combine UI tests with other systems, measurement devices, sensors and databases
- Rerecording of partial scenarios without a need to repeat the whole session
- High reuse of partial scenarios by factoring out common action sequences (for example login sequence, ordering form filling, query checks etc.)
- Time measurements of response and page generation
- Create load and performance tests
Selenium IDE[Bearbeiten]
Selenium IDE is an extension of the Mozilla Firefox browser, written in JavaScript. It records the interactions with the Firefox browser. For replay, any common browser like Internet Explorer, Firefox, etc. are supported. Selenium IDE is an open source tool available from [1] and more information is found on the web site [2].
First Steps[Bearbeiten]
Make a Recording[Bearbeiten]
- Menü: "Extras" → "Plugins" → "Webtest" → "Start Recording..." ( or click on the
 button).
 - Firefox with Selenium IDE will startup (may take a while when done for the first time)
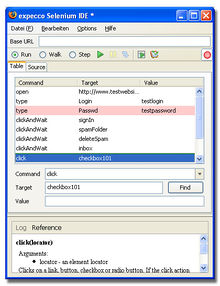
- You can also start the Selenium IDE manually. In your Firefox, click on "View" → "Sidebar" → "Selenium IDE". Or, in order to start Selenium IDE in a separate window, select "Extras" → "Selenium IDE"
- After the startup, the recording mode is already enabled (red "record" button)
- All of your actions are now recorded
- The right mouse button's context menu provides additional (mostly verification-) commands which operate on the selected element or the element under the mouse pointer
- The recorded actions are shown in the Selenium IDE window
- It is possible to make changes to the recording at this early stage in this window
- You can also insert additional operations manually here
- When finished with the desired scenario, finish the recording by clicking on the red "record" button
- Click the
 to transfer (i.e. import) the recording into expecco
- As an alternative, import existing captures manuell manually (eg. existing Seleniumese Scripts)
- In the import-dialog, enter a name for the recorded sequence
- The recording is now available inside expecco as a new compound action block. You will find it under its name in the navigation tree (like any other action block)
- Select the tree item to see its definitions and to start editing
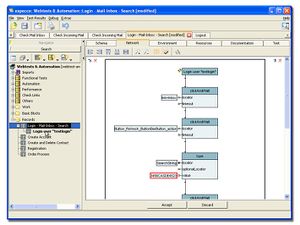
- The "Network"-Tab contains the individual actions of the recording
- The "Test/Demo" contains the
 -button, which instantly replays the recording
Refactoring a Recording[Bearbeiten]
Partial sequences which can be reused as a group (such as Login, filling of forms, etc.) can be extracted into a separate action block. Your test diagram will become both easier to understand and also easier to reuse if you do so. A clever selection of reusable sequences is a prerequisite for later cost savings.
- Choose the "Network" tab
- Select the steps to extract (either individually by CTRL-click, Shift-click, or by dragging a rectangle around the group)
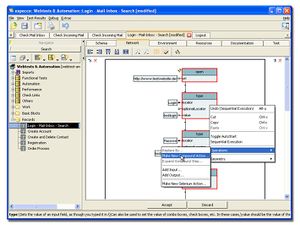
- Click the right mouse button for a context menu on the selection. Choose
Contextmenu: "Refactoring" → "Create new compound and Replace" - Enter a useful name for the new compound action
- The new step (which replaces your selection) is now shown in the diagram
- The navigation tree contains your new compound action
- You can reuse this action wherever needed in other scenarios
- You can parametrize the new action by making any recorded value (strings) a parameter of the new action
- Changes to the sequence have to be made only once
Extending a Recorded Action[Bearbeiten]
Recorded actions can be extended with actions from the Standard- or any other library
- In the navigation tree, expand the element "Imports" → "StandardLibary"
- Choose a group to see the contained actions
- As an alternative, search for actions by name ("Search"-tab)
- Select the compound action's diagram into which you want to place the new action (select the "Network" tab)
- Darg&Drop the desired action block from the tree into the diagram
- Connect input values and/or trigger-in/trigger-out pins
Add Additional Logging Actions[Bearbeiten]
The following describes how a recorded "verify" action is to be replaced by a fail action which will also record the failure in the log.
- Start a capture as described above
- In the webpage, right-click on any text element
- Contextmenu: "verifyTextPresent <name of selected element>"
- Import the recording into expecco
- Navigate to the capture action block and find the "verifyTextPresent" step.
- Rightclick on the step "verifyTextPresent"
- Context menu: "Operationen" → "Replace by..."
- In the dialog, find the "isTextPresent" entry and select it; now the "verify" action has been replaced by an "is"-action.
- In the tree, find the group named "Imports" → "StandardLibary" → "Assertions, Exceptions & Logging"
- Drag the "Log[Failure]"-action into the diagram
- Alternativ wählen Sie im Navigationsbereich den Reiter "Search" aus und geben Sie den Name des Bausteins als Suchbegriff ein
- select and rightclick on the "Log[Failure]"-step
- Contextmenu: "Special Pins..." → "Trigger-Input"
- Connect the "triggerNo"-output of "isTextPresent" with the new trigger-input
- Doublclick on the "errorMessage"-input and enter a better error message
When the test is now executed, and the text is missing from the page, the testcase will report a failure. In a similar way, warning log entries are generated, which will not abort the testcase.
Advanced Tasks[Bearbeiten]
Filling a Webform via a CSV-File[Bearbeiten]
- Choose the "Network" tab
- Select the steps which make up the fillout of the webform, including actions to navigate to that form. Be reminded that these actions will later be repeated for every record in the CSV file; so they should leave the browser in a state (navigation point) where the navigation actions make sense. To mark those steps, use the known mechanisms (CTRL-click, Shift-click or rubber-band rectangle)
- then click the right mouse button over one of the selected steps
- Context menu: "Refactoring" → "New compound Web-Parameter-Action & replace..."
- Enter a name for the new Web-Parameter-Action
- Confirm with "Yes/OK" to get the extracted key-value pairs written into a CSV-file.
- In the tree, navigate to "Imports" → "StandardLibary" → "Files & Directories" → "Files"
- (alternatively select the search tab and find the action by its name or name fragment - in this case "CSV")
- Drag and drop the "File [ReadCSV]" action into the diagram
- Doubleckick on the "CSVFileOrStringCol" input and enter the path to the saved CSV file
- Connect the "CSVLineValues" output with the "optionalParameterSet"-input of the just-created action step
As an alternative, save the CSV as an attachment and drag the attachment into the diagram.
Integrating User Interaction[Bearbeiten]
The following adds an interactive dialog, which will appear during the test run and ask the tester for some string value. This may be required to enter passwords or other dynamic data during the test run.
- Choose the "Network" tab
- Navigate the tree to "Imports" → "StandardLibary" → "GUI-Dialogs" aus
- Drag&drop the "Dialog [Request String]"-action into the diagram
- Give the "requestLabel"-input a useful message for the input dialog
- In addition, provide a box-title at the "title"-input
- Connect the "answer"-output to whichever step needing that value
There are multiple different dialogs available in the standard library. For passwords, you may prefer the "Request Password" dialog, which does not show the entered characters on the screen.
Known Problems / Hints & Tricks[Bearbeiten]
click vs. clickAndWait[Bearbeiten]
- Depending on various external factors (transmissionrate, responsetime, network load), the Selenium IDE may occasionally record a click of an element which is followed by a reload of a page either as ">click<" or as ">clickAndWait<". Therefore, you should check your recording (my replaying a few times) in the Selenium IDE (or later in expecco).
- Possible Error 1:
- A ">click<" is recorded, although a page is loaded. Since the load may take a variable amount of time, the Selenium IDE may stop with the following command, because that is executed before the page has been completely loaded.
- Fix:
- Replace the ">click<"-command by a ">clickAndWait<".
- Possible Error 2:
- A ">clickAndWait<" is recorded, although not page follows (i.e. an internal JavaScript action is done inside the browser). When replayed, an error is reported because the Selenium IDE is waiting for a page to come, which never comes (timeout).
- Fix:
- Replace the ">clickAndWait<" by a ">click<"
- Possible Error 1:
Recording of Actions while a Page is still being Loaded[Bearbeiten]
- Problem: Actions being made while a page is not completely loaded may be missing in the recording sequence.
- Example: Click on a link in an already displayed navigation menu, while the rest of the page is still being loaded
- Solution: Only perform actions on the page, after it has been completely loaded (look at the status bar in the browser). Also, watch the Selenium IDE's recording list.
Error Message: "Element is not clickable at point..."[Bearbeiten]
The Chrome Browser reports this error, when a click on an element's position would not target the expected element. A typical error message looks like:
"org.openqa.selenium.WebDriverException: Element is not clickable at point (411, 675).
 Other element would receive the click: ...
This happens if:
- the clicked element is invisible, and the click would go to the element under it (usually the body or a surrounding div)
- another element came lying above the element (this happens for example, if the element is scrolled into the view and it ends up lying below an overlay)
As a workaround, disable the "scrollIntoView" function of the "Click (Scroll into View)" action, or use the "Click" action (which does not scroll). (see also: https://stackoverflow.com/questions/11908249/debugging-element-is-not-clickable-at-point-error)
Additional Infos[Bearbeiten]
Blocks for Selenium Commands[Bearbeiten]
For every Selenium command, a corresponding block exists in the Selenium Library.
There is a distinction drawn between the following command prefixes:
- Is - Commands beginning with "Is" return TRUE or FALSE. Example: "isTextPresent"
- Get - commands beginning with "Get" return a STRING containing the requested value. Example: "getTitle"
- Assertion - commands beginning with "Assert" compare against an expected value and report an error in the negative case. Unless handled as an exception, this leads into the abortion of the test with a failed status. Example: "assertElementHeight" or "assertTextPresent"
- Verification - commands beginning with "Verify" compare against an expected value and create a log entry in the negative case. The test execution continues. Example: "verifyElementHeight"
For all Is/Get commands corresponding Assert/Verify commands are available.
Please look at the Official Selenium Documentation for the meaning of the different locators and commands. Also, find information on individual blocks in the "Selenium Library Reference".
Additional Functions (which are not available in pure Selenium)[Bearbeiten]
A number of additional blocks and functions have been added to the basic set of Selenium functions. These are mostly higher level complex search operations, especially to search for text or values in tables. Also, new combination blocks waitForElementAndXXX have been added for convenience - these combine the waitForElementPresent with another function, such as Click or Type.
Back to Online Documentation.


