Testing Java Applications using Groovy blocks/en: Unterschied zwischen den Versionen
Cg (Diskussion | Beiträge) |
Cg (Diskussion | Beiträge) |
||
| (39 dazwischenliegende Versionen desselben Benutzers werden nicht angezeigt) | |||
| Zeile 1: | Zeile 1: | ||
== Introduction == |
== Introduction == |
||
Groovy is an interpreter for a language very similar to Java which runs inside a Java virtual machine. Using |
Groovy is an interpreter for a language very similar to Java which runs inside a Java virtual machine. Using Groovy, Java packages/frameworks/classes can be accessed, objects in Java instantiated and functions called in them. |
||
== Quick Start == |
== Quick Start == |
||
=== The Simplest Possible Groovy Action === |
|||
For a very quick start, |
For a very quick start, |
||
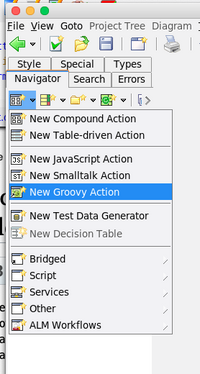
create a new Groovy action: |
create a new Groovy action: |
||
[[Datei:groovy_create_action_001.png]] |
|||
[[Datei:groovy_create_action_001.png|200px]] |
|||
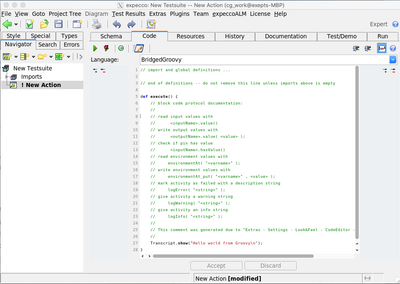
expecco will create a simple demo-action, which when executed sends a hello message to the Transcript (the expecco console). The autogenerated code contains some comments which are meant as a reminder for beginners. They tell you how to access pin values and how to send diagnostic messages to expecco. |
|||
You may remove those comments (and change the settings to no longer generate them) once you know the interface. |
|||
[[Datei:groovy_create_action_002.png|400px]] |
|||
First, make sure that the Transcript window is open (via the "''Extras''" → "''Tools''" → "''Transcript''" menu) and visible. |
|||
<br>Then run the new groovy action. |
|||
If all goes well, you should see "Hello world from Groovy" in the Transcript window. |
|||
If not, follow this checklist: |
|||
* Java installed? |
|||
* path to Java defined in the settings? |
|||
** if yes: check if correct |
|||
** if not: |
|||
*** either set the path, in the settings |
|||
*** or else make sure that java is in your shell's PATH (or command.com under Windows) |
|||
expecco will call Java either via the explicit path as set in the settings dialog, |
|||
or simply call "java", assuming that it is found along your shell PATH setting. |
|||
This simple action should work before you continue with this tutorial. |
|||
=== Receiving Simple Data from Java === |
|||
To pass simple objects like numbers or strings from Java to expecco, |
|||
add an output pin to the action.<br> |
|||
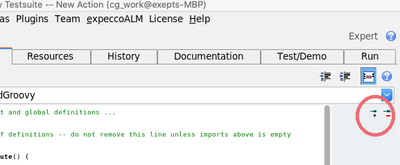
Either click on the "+" at the top-right of the code editor: |
|||
[[Datei:groovy_create_action_003.png|400px]] |
|||
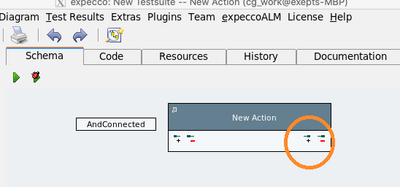
or the "+" in the schema editor): |
|||
[[Datei:groovy_create_action_004.png|400px]] |
|||
By default, expecco generates pin names as "out1", "out2", etc. |
|||
You may rename the pin to be more descriptive. |
|||
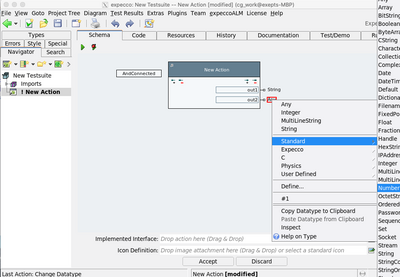
Change the datatype of the pin to "Number" (or "String") via the pin's context menu |
|||
(either select the pin, then right click, then choose "''Datatype''" or right click on the datatype as in the next picture). |
|||
[[Datei:groovy_create_action_005.png|400px]] |
|||
<br>Then, edit the to code to: |
|||
def execute() { |
|||
// block code protocol documentation: |
|||
// ... |
|||
// |
|||
out1.value("Hello"); |
|||
out2.value(12345); |
|||
} |
|||
If you prefer shorter code, remove the explanation comments. |
|||
Now, run the action again. |
|||
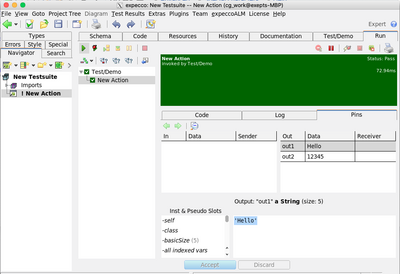
The Transcript will no longer receive any textual output, but the two values appear now at the action's output pin: |
|||
[[Datei:groovy_create_action_006.png|400px]] |
|||
=== Sending Simple Data to Java === |
|||
In a similar fashion, create an input pin, give it an appropriate type ("String" in this example), and change the code to: |
|||
def execute() { |
|||
String myInput = in1.value(); |
|||
out1.value("Hello " + myInput); |
|||
out2.value(12345); |
|||
} |
|||
this will read a string from the input named "in1", prepend the hello-characters, and generate an output value. |
|||
Of course, to execute it, we now have to provide an input value for the execution. |
|||
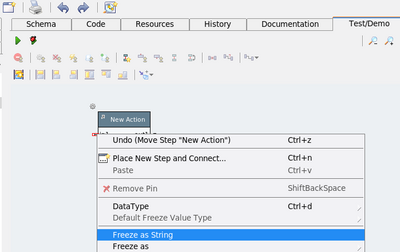
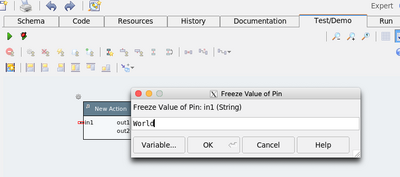
For the Test/Demo run, switch to the test network tab, and give a constant value (aka free value) to the input pin: |
|||
[[Datei:groovy_create_action_007.png|400px]] |
|||
[[Datei:groovy_create_action_008.png|400px]] |
|||
(freeze values can also be entered by double-clicking on an unconnected pin). |
|||
Now, your Test/Demo network looks like: |
|||
[[Datei:groovy_create_action_010.png|400px]] |
|||
Run this again, to get "Hello World" at the output pin. |
|||
=== Creating an Object Inside Groovy === |
|||
As the next step, let us instantiate a more complex object inside the JavaVM |
|||
and pass the object back to expecco. |
|||
First, add another output pin to the action, and change its datatype to "Any". |
|||
Then, change the code to: |
|||
def execute() { |
|||
String myInput = in1.value(); |
|||
Object myList = new ArrayList(10); |
|||
out1.value("Hello " + myInput); |
|||
out2.value(12345); |
|||
myList.add(1); |
|||
myList.add(2); |
|||
myList.add(99); |
|||
out3.value(myList); |
|||
} |
|||
so, the code generates an ArrayList instance, and sends it to the output pin named "out3". |
|||
Run the code and take a look at the output pin's value (in the activity log): |
|||
[[Datei:groovy_create_action_011.png|400px]] |
|||
As you see, the ArrayList was created and a reference to it is shown in the log. |
|||
=== Passing an Object Reference back to Groovy === |
|||
Before we continue, let us rename the previous example action to "Sending Action" to make things more self explaining in the diagram. |
|||
Then create a second groovy action, named "Receiving Action", |
|||
and give it a single input pin named "in1" of type "Any", |
|||
and two output pins named "out1" and "out2", both with type "Any". |
|||
Then define that action's code as: |
|||
def execute() { |
|||
Object myList = in1.value(); |
|||
out1.value( myList[0] ); |
|||
out2.value( myList[1] ); |
|||
} |
|||
In short, that second action extracts the first two elements of a passed-in list, and sends them to its own outputs. Think of it as a getter to an incoming object's elements. |
|||
[[Datei:groovy_create_action_012.png|400px]] |
|||
Then, edit that second action's Test/Demo network so that the first action's output (the instantiated ArrayList) is passed as input to the second action: |
|||
[[Datei:groovy_create_action_013.png|400px]] |
|||
When executed, the activity log looks like: |
|||
[[Datei:groovy_create_action_014.png|400px]] |
|||
=== Importing a Java Framework === |
|||
Obviously, the above was an oversimplified example. |
|||
However, many Java frameworks will need objects such as connection handles to be passed from one "creation-like" function to another "send- or receive data" function. And the above does exactly that (albeit with a simple ArrayList object). |
|||
To call functions in a java framework, you have to: |
|||
* make sure that the jar-file is found |
|||
** either by setting a CLASSPATH variable in your environment before expecco is started (because the called JavaVM will see that variable) |
|||
** or by adding the jar path to the expecco Groovy settings<br>(in "''Extras''" - "''Settings''" → "''Execution''" → "''External Interpreters''" → "''Groovy Class Path''"). |
|||
And obviously, you'll have to add an import statement to your Groovy code. |
|||
== Advanced Debugging: The Bank Account Example == |
|||
The following example demonstrates how to use the [[Java Browser/en | Java Browser]], the [[Java Debugger/en | Java Debugger]] and the [[SmallSense/en | SmallSense]] plugins for Java application test development. It also gives more examples on how to use Groovy blocks. |
The following example demonstrates how to use the [[Java Browser/en | Java Browser]], the [[Java Debugger/en | Java Debugger]] and the [[SmallSense/en | SmallSense]] plugins for Java application test development. It also gives more examples on how to use Groovy blocks. |
||
| Zeile 13: | Zeile 172: | ||
'''Note that JAVA Browser und Java Debugger Plugins are experimental and require seperate licences!''' |
'''Note that JAVA Browser und Java Debugger Plugins are experimental and require seperate licences!''' |
||
This section presents more advanced features, showing how internals of your Java code can be debugged and tested. |
|||
== The Bank Account Example == |
|||
Be reminded, that expecco is not usually meant and used as a white-box testing tool (ie. looking inside an application). However, the following shows that it does provide some support for such tests. |
|||
Most users will not need this level of introspection. |
|||
Here we'll use a simple "Bank Account" application as system under test. |
|||
"Bank Account" is a very simple Java library that models banks and accounts and allow transactions among accounts. |
"Bank Account" is a very simple Java library that models banks and accounts and allow transactions among accounts. |
||
| Zeile 68: | Zeile 230: | ||
[[Java Browser/en]] plugin for expecco provides a simple browser to load and browse Java code directly from within the expecco environment. |
[[Java Browser/en]] plugin for expecco provides a simple browser to load and browse Java code directly from within the expecco environment. |
||
To open a Java Browser on "Bank Account" code, select ''Plugins'' |
To open a Java Browser on "Bank Account" code, select "''Plugins''" → "''Java Browser''" → "''Open...''" from the expecco main menu and define a new Java browser workspace. A Java browser workspace is a folder where the Java Browser stores all the Java code and sources (similar to an eclipse workspace). |
||
You can define multiple workspaces and switch between them at any time. |
You can define multiple workspaces and switch between them at any time. |
||
If you don't have a workspace for "Bank Account" yet, just enter an empty directory and new workspace will be created. |
If you don't have a workspace for "Bank Account" yet, just enter an empty directory and new workspace will be created. |
||
Initially the workspace is empty, so to actually see the code of "Bank Account", we have add it's code and sources to it. |
Initially the workspace is empty, so to actually see the code of "Bank Account", we have add it's code and sources to it. |
||
To do so, click on the ''Open Settings'' button in the Java Browser window or select ''Workspace'' |
To do so, click on the ''Open Settings'' button in the Java Browser window or select "''Workspace''" → "''Settings''" from the window menu. |
||
In the Settings dialog, click on ''Add Library'' and add ''Bank Account'' code. |
In the Settings dialog, click on ''Add Library'' and add ''Bank Account'' code. |
||
Once added and confirmed (by pressing ''OK'' button), you may browse through the code, check what classes and methods are available and so on. |
Once added and confirmed (by pressing ''OK'' button), you may browse through the code, check what classes and methods are available and so on. |
||
| Zeile 174: | Zeile 336: | ||
We might expect the result to look like the in first test, except that the amount being -500 rather than 500 and the final balances being exchanged. |
We might expect the result to look like the in first test, except that the amount being -500 rather than 500 and the final balances being exchanged. |
||
Actually such a test would fail. As you may see, the code throws a |
Actually such a test would fail. As you may see, the code throws a ''TransactionException'' with a (rather unspecific) message ''Internal error occurred during transaction''. |
||
The message is a bit worrying as, if negative value are not allowed, the error message should say so. |
The message is a bit worrying as, if negative value are not allowed, the error message should say so. |
||
Our feeling is that something else went wrong... |
Our feeling is that something else went wrong... |
||
| Zeile 181: | Zeile 343: | ||
To find out, we may again use the Java debugger plugin and place an ''exception breakpoint'', a special kind of breakpoint that stops program execution whenever an exception of a specific type is thrown. |
To find out, we may again use the Java debugger plugin and place an ''exception breakpoint'', a special kind of breakpoint that stops program execution whenever an exception of a specific type is thrown. |
||
To do so, go to ''Plugins'' |
To do so, go to "''Plugins''" → "''Java Debugger''" → "''Breakpoint List''". |
||
This opens a little window displaying all Java breakpoints, including the ''line breakpoints'' we have used earlier. |
This opens a little window displaying all Java breakpoints, including the ''line breakpoints'' we have used earlier. |
||
Use the context menu (right-click in the list) to add an exception breakpoint: |
Use the context menu (right-click in the list) to add an exception breakpoint: |
||
[[Datei:expecco_BankAccounts_018.png]] |
[[Datei:expecco_BankAccounts_018.png]] |
||
Aktuelle Version vom 4. Februar 2022, 08:40 Uhr
Inhaltsverzeichnis
Introduction[Bearbeiten]
Groovy is an interpreter for a language very similar to Java which runs inside a Java virtual machine. Using Groovy, Java packages/frameworks/classes can be accessed, objects in Java instantiated and functions called in them.
Quick Start[Bearbeiten]
The Simplest Possible Groovy Action[Bearbeiten]
For a very quick start, create a new Groovy action:
expecco will create a simple demo-action, which when executed sends a hello message to the Transcript (the expecco console). The autogenerated code contains some comments which are meant as a reminder for beginners. They tell you how to access pin values and how to send diagnostic messages to expecco. You may remove those comments (and change the settings to no longer generate them) once you know the interface.
First, make sure that the Transcript window is open (via the "Extras" → "Tools" → "Transcript" menu) and visible.
Then run the new groovy action.
If all goes well, you should see "Hello world from Groovy" in the Transcript window.
If not, follow this checklist:
- Java installed?
- path to Java defined in the settings?
- if yes: check if correct
- if not:
- either set the path, in the settings
- or else make sure that java is in your shell's PATH (or command.com under Windows)
expecco will call Java either via the explicit path as set in the settings dialog, or simply call "java", assuming that it is found along your shell PATH setting.
This simple action should work before you continue with this tutorial.
Receiving Simple Data from Java[Bearbeiten]
To pass simple objects like numbers or strings from Java to expecco,
add an output pin to the action.
Either click on the "+" at the top-right of the code editor:
or the "+" in the schema editor):
By default, expecco generates pin names as "out1", "out2", etc. You may rename the pin to be more descriptive.
Change the datatype of the pin to "Number" (or "String") via the pin's context menu (either select the pin, then right click, then choose "Datatype" or right click on the datatype as in the next picture).
Then, edit the to code to:
def execute() {
   // block code protocol documentation:
   // ...
   //
   out1.value("Hello");
   out2.value(12345);
}
If you prefer shorter code, remove the explanation comments.
Now, run the action again. The Transcript will no longer receive any textual output, but the two values appear now at the action's output pin:
Sending Simple Data to Java[Bearbeiten]
In a similar fashion, create an input pin, give it an appropriate type ("String" in this example), and change the code to:
def execute() {
   String myInput = in1.value();

   out1.value("Hello " + myInput);
   out2.value(12345);
}
this will read a string from the input named "in1", prepend the hello-characters, and generate an output value.
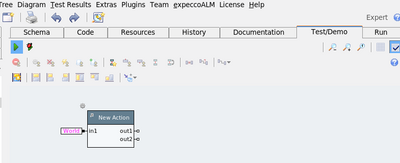
Of course, to execute it, we now have to provide an input value for the execution. For the Test/Demo run, switch to the test network tab, and give a constant value (aka free value) to the input pin:
(freeze values can also be entered by double-clicking on an unconnected pin).
Now, your Test/Demo network looks like:
Run this again, to get "Hello World" at the output pin.
Creating an Object Inside Groovy[Bearbeiten]
As the next step, let us instantiate a more complex object inside the JavaVM and pass the object back to expecco.
First, add another output pin to the action, and change its datatype to "Any". Then, change the code to:
def execute() {
   String myInput = in1.value();
   Object myList = new ArrayList(10);

   out1.value("Hello " + myInput);
   out2.value(12345);

   myList.add(1);
   myList.add(2);
   myList.add(99);
   out3.value(myList);
}
so, the code generates an ArrayList instance, and sends it to the output pin named "out3".
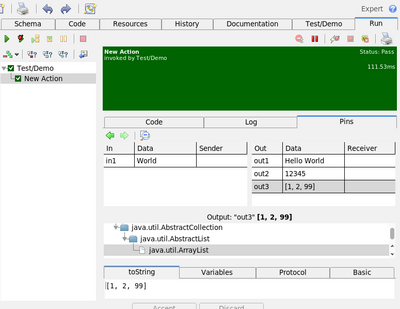
Run the code and take a look at the output pin's value (in the activity log):
As you see, the ArrayList was created and a reference to it is shown in the log.
Passing an Object Reference back to Groovy[Bearbeiten]
Before we continue, let us rename the previous example action to "Sending Action" to make things more self explaining in the diagram.
Then create a second groovy action, named "Receiving Action", and give it a single input pin named "in1" of type "Any", and two output pins named "out1" and "out2", both with type "Any".
Then define that action's code as:
def execute() {
   Object myList = in1.value();

   out1.value( myList[0] );
   out2.value( myList[1] );
}
In short, that second action extracts the first two elements of a passed-in list, and sends them to its own outputs. Think of it as a getter to an incoming object's elements.
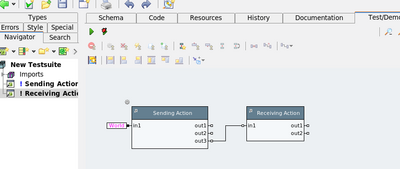
Then, edit that second action's Test/Demo network so that the first action's output (the instantiated ArrayList) is passed as input to the second action:
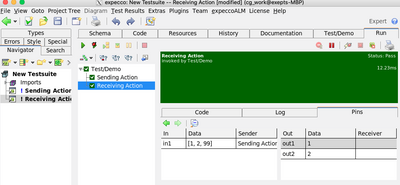
When executed, the activity log looks like:
Importing a Java Framework[Bearbeiten]
Obviously, the above was an oversimplified example.
However, many Java frameworks will need objects such as connection handles to be passed from one "creation-like" function to another "send- or receive data" function. And the above does exactly that (albeit with a simple ArrayList object).
To call functions in a java framework, you have to:
- make sure that the jar-file is found
- either by setting a CLASSPATH variable in your environment before expecco is started (because the called JavaVM will see that variable)
- or by adding the jar path to the expecco Groovy settings
(in "Extras" - "Settings" → "Execution" → "External Interpreters" → "Groovy Class Path").
And obviously, you'll have to add an import statement to your Groovy code.
Advanced Debugging: The Bank Account Example[Bearbeiten]
The following example demonstrates how to use the Java Browser, the Java Debugger and the SmallSense plugins for Java application test development. It also gives more examples on how to use Groovy blocks.
Note that JAVA Browser und Java Debugger Plugins are experimental and require seperate licences!
This section presents more advanced features, showing how internals of your Java code can be debugged and tested. Be reminded, that expecco is not usually meant and used as a white-box testing tool (ie. looking inside an application). However, the following shows that it does provide some support for such tests.
Most users will not need this level of introspection.
Here we'll use a simple "Bank Account" application as system under test. "Bank Account" is a very simple Java library that models banks and accounts and allow transactions among accounts.
The code of the "Bank Account" application is not correct at place by purpose. You may download a full Eclipse project containing the example code at somewhere.
Setting up expecco[Bearbeiten]
For the sake of brevity, in this tutorial we'll use simple local JVM managed by expecco to run "Bank Account"s code. Please read Java Interface Library v2 on how to connect to an already running Java application on a remote machine
As for any Java application, we have to set the classpath properly, so the JVM can find application code.
Let's define an expecco environment variable named CLASSPATH_BANKACCOUNT, defining where the "Bank Account" code is actually located:
Then let's define a "SetUp" block that actually adds the directory to the JVM class path. A simple Smalltalk elementary block will do it:
execute
    JAVA::Java singletonInstance
        addToClassPath: (self environmentAt: 'CLASSPATH_BANKACCOUNT')
This block has to be run before any other Java code using "Bank Account" classes is executed. Putting it as test plan's pre-execution block !ref! might be a good way to ensure it.
Designing a test[Bearbeiten]
Once the class path is set up, we start designing and implementing tests. Let's start with a simple test that creates two bank accounts and then makes a transfer from one account to the other. Then finally the test should check, if the final balances are what we would expect.
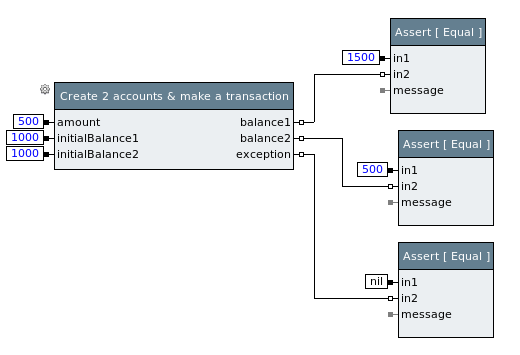
The very simple test would be then:
- create account A1 with initial balance 1000.
- create account A2 with initial balance 1000.
- transfer 500 from account A2 to account A1.
- check that final balance of A1 is 1500
- check that final balance of A2 is 500.
- check that no exception was thrown.
We will encapsulate the first three steps into a single special setup block; let's call it Create 2 accounts & make a transaction. it will take the initial balances and the amount to transfer from input pins and report the final balances to output pins. In addition, it will report any possibly raised exception via its exception output pin.
By separating this logic to a separate block we can easily create more tests with different values, to test different scenarios like: to check that an exception is raised when there are not enough funds on a charged account.
So, in expecco, the very simple testcase outlined above would look like:
Implementing the first test[Bearbeiten]
In order to implement the test as outlined above, we implement a block that actually calls the Java API.
Java Browser/en plugin for expecco provides a simple browser to load and browse Java code directly from within the expecco environment. To open a Java Browser on "Bank Account" code, select "Plugins" → "Java Browser" → "Open..." from the expecco main menu and define a new Java browser workspace. A Java browser workspace is a folder where the Java Browser stores all the Java code and sources (similar to an eclipse workspace). You can define multiple workspaces and switch between them at any time. If you don't have a workspace for "Bank Account" yet, just enter an empty directory and new workspace will be created. Initially the workspace is empty, so to actually see the code of "Bank Account", we have add it's code and sources to it. To do so, click on the Open Settings button in the Java Browser window or select "Workspace" → "Settings" from the window menu. In the Settings dialog, click on Add Library and add Bank Account code. Once added and confirmed (by pressing OK button), you may browse through the code, check what classes and methods are available and so on.
Let's implement the Create 2 accounts & make a transaction block now. Create a new Groovy block and write the code that calls the "Bank Account" Java API.
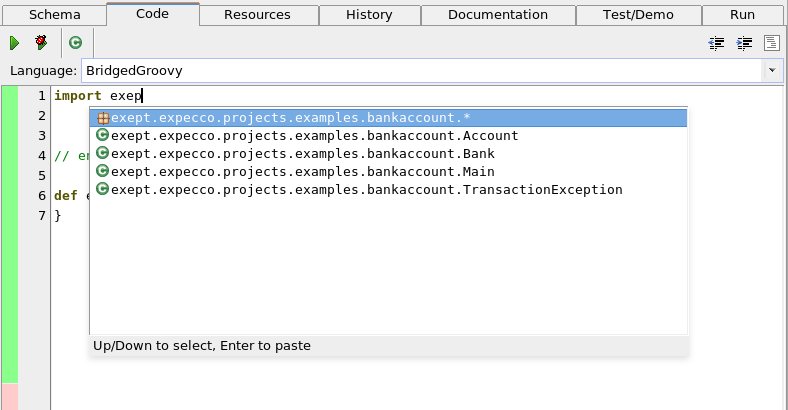
To make writing code a little bit easier, the SmallSense/en plugin together with the Java Browser/en plugin provide limited completion support for Groovy code. The completion engine takes information about available classes and methods from the Java workspace. In other words, if you have no Java browser workspace opened, the completion won't be able to suggest anything useful. Notice, that the completion support is not as advanced as (say) the eclipse engine.
To trigger the completion, press Ctrl-Space:
After some editing, the block's code may look similar to:
import exept.expecco.projects.examples.bankaccount.Bank;
import exept.expecco.projects.examples.bankaccount.Account;
// end of definitions -- do not remove this line unless imports above is empty

def execute() {
   Bank b = new Bank( "Some bank" );

   Account account1 = new Account( "Owner 1" );
   b.addAccount( account1 );
   account1.setBalance( initialBalance1.value() );

   Account account2 = new Account( "Owner 2" );
   b.addAccount( account2 );
   account2.setBalance( initialBalance2.value() );

   try {
       account1.credit(account2, amount.value() );
       exception.value( null );
   } catch ( TransactionException e ) {
       exception.value( e );
   }

   balance1.value( account1.getBalance() );
   balance2.value( account2.getBalance() );
}
Now we have all bits together to implement and run the simple test. It passes.
Debugging tests I[Bearbeiten]
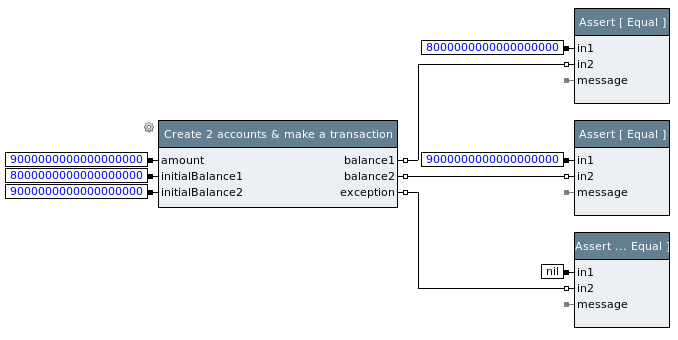
One test passed. but let's create a second one. Similar, but with different, extreme and invalid amount values. Let's try to transfer an awful lot of money so the balance of the credited account would exceed the maximum allowed balance. According to a specification [!ref!] the transaction should not proceed and an TransactionException should be thrown. The test may look as follows:
If you try to run it, you should see it failing. Now it's time to figure out why and this is the point where the Java Debugger/en plugin is useful. Basically, the Java Debugger plugin allows you to debug code running inside the remote JVM - placing breakpoints, single-stepping through the code, inspecting values of variables and objects, etc.
Back to our failing test, the code of the Groovy block is likely to be correct. The actual transfer is done in method BankAccount#credit() [!ref!]. Let's put a breakpoint here and then single-step through the code until we reach the point where the actual computation is done.
To place a breakpoint, open a Java Browser, select class Account and method credit() and then put a breakpoint at the beginning of the method (by double clicking in the editor, left to the line number):
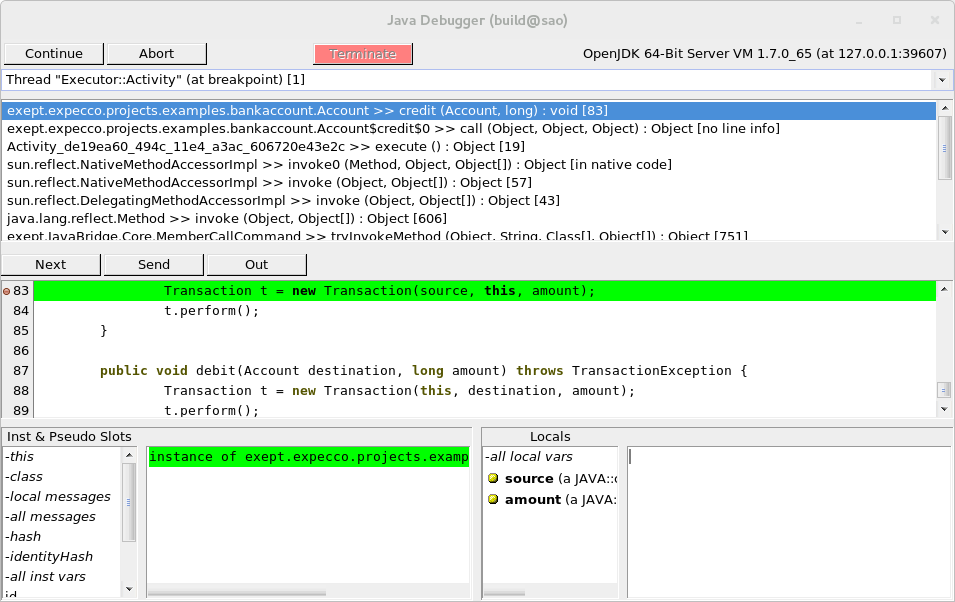
Now run the test again. A Java Debugger window should appear:
The debugger shows the Java execution stack at the top, source code of the selected method in the middle and an inspector for this and for local variables in the bottom part (similar to the builtin expecco debugger for elementary code). Let's single step a little bit further, into the method Transaction#perform() to line 55. Use button Next to step-over to next line and Send to step-into called methods.
You may use the inspector at the bottom to look at the value of amount or other local variables. If you double-click to an object value as, say, source field of the transaction object, a new inspector on that object is opened:
If you like, these little inspector windows can be kept open to see the value as it changes in the future. The code around line 55 in Transaction.java reads as:
54    // Check if destination account would exceed MAX_BALANCE after crediting.
55    if ((oldDestinationBalance + amount) > Account.MAX_BALANCE) {
56            throw new TransactionException("Maximum account balance exceeded +"+ source.getId());
57    }
58
59    long newSourceBalance = oldSourceBalance - amount;
It checks if the new balance of the destination account would exceed the maximum, and of so, just throw an exception. At least according to the documentation! By inspecting values of amount and oldDestinationBalance you may see that the values are what one would expect, so if you press Next button, the execution should enter the "if"-body and throw an exception. If you actually do it, you'll see that the condition is satisfied and the execution proceeds to line 59.
This is clearly a bug in the application code (see classical integer overflow in this case). The developer did not care for the possibility of a numeric overflow in the integer code, which wraps around and returns wrong results for values larger the integer range (32bit / 64bit, depending on the integer's type). So the test developer / tester may just submit a bug to development team, and proceed testing further areas of the application.
Debugging tests II[Bearbeiten]
Let's write yet another test that tries to transfer a negative amount. The API documentation does not specify the behaviour in this case explicitly. We might expect the result to look like the in first test, except that the amount being -500 rather than 500 and the final balances being exchanged.
Actually such a test would fail. As you may see, the code throws a TransactionException with a (rather unspecific) message Internal error occurred during transaction. The message is a bit worrying as, if negative value are not allowed, the error message should say so. Our feeling is that something else went wrong...
To find out, we may again use the Java debugger plugin and place an exception breakpoint, a special kind of breakpoint that stops program execution whenever an exception of a specific type is thrown. To do so, go to "Plugins" → "Java Debugger" → "Breakpoint List". This opens a little window displaying all Java breakpoints, including the line breakpoints we have used earlier. Use the context menu (right-click in the list) to add an exception breakpoint:
A dialog will appear, where you can specify the exception class name. In this case, exept.expecco.projects.examples.bankaccount.TransactionException. Be aware, that it has to be a fully qualified Java class name. Also, you have to tick both Caught and Uncaught checkboxes, as the Java bridge code catches all exceptions.
Now run the test again. A debugger should appear, stopping at line 65 in Transaction.java. The code here simply catches all exceptions and re-throws a TransactionException. So still it's not clear what is the real cause of the exception. To find out, let's check what is the value of the original exception, stored in variable e (click or double-click on the private variable e in the bottom left inspector part of the debugger. That is the list which shows local variables).
It's a java.security.InvalidParameterException. Let's just put another exception breakpoint, now for java.security.InvalidParameterException, and run the test again. Now this should reveal the origin of the problem.
If you run it again, you may see that the exception is thrown in Transaction#check() if the amount specified is less than zero.
Wrap-up[Bearbeiten]
The Java browser plugin, Java Debugger plugin and SmallSense plugin can make test development using Groovy block easier:
- Java browser plugin provides a way to browse Java code right from the expecco environment, without need of external, third-party IDE.
- SmallSense plugin provides a simple completion support to Groovy block editor, making editing easier.
- Java Debugger plugin provides in-expecco debugging facilities to debug Java code running system under test, making test debugging easier.
These plugins are not necessary to use Groovy blocks. However, working with complex Java code might become tricky when it comes to test debugging. While it is possible to use third-party Java IDEs and debuggers, the added value of these plugins is the tight integration with expecco.
For more information, refer to:
Download[Bearbeiten]
- Eclipse Project with "BankAccount" code - bankaccount-eclipse.zip
- Expecco test suite with tests from this tutorial - bankaccount.ets
TODO[Bearbeiten]
- cleanup You / we
- Upload standalone .ets and .zip with Eclipse project Java doc somewhere
- Upload Java doc somewhere
- Fix crossrefs (to javadoc and other documents), once above get sorted.
