HelpWizard Pages Start Report1/en: Unterschied zwischen den Versionen
Zur Navigation springen
Zur Suche springen
Sr (Diskussion | Beiträge) |
Sr (Diskussion | Beiträge) |
||
| Zeile 10: | Zeile 10: | ||
* The new created testsuite contains the "Master Testplan Rel. 1". Select it. |
* The new created testsuite contains the "Master Testplan Rel. 1". Select it. |
||
[[Datei:SelectedMasterTestplanRel1.png|200px]] |
[[Datei:SelectedMasterTestplanRel1.png|200px]] |
||
* Execute the testplan by clicking on the execute button [[Datei:ExecuteTestplanButton.png|32px]]. Confirm all dialogs until the testplan execution has been finished. The testplan has to appear like [[Datei:SucceededTestplan.png]]. |
* Execute the testplan by clicking on the execute button [[Datei:ExecuteTestplanButton.png|32px]]. Confirm all dialogs until the testplan execution has been finished. The testplan has to appear like [[Datei:SucceededTestplan.png|160px]]. |
||
Click on the Printer-icon in the top toolbar.<br> |
Click on the Printer-icon in the top toolbar.<br> |
||
Version vom 1. Oktober 2020, 09:11 Uhr
Report Generation
![]()
![]()
The report is the documentation about one or many executed testplan(s) or action(s). Before you are able to generate a report, you need at least one executed testplan or action.
1) Execute a testplan
- For e.g. click on the "New Testsuite" button
 in the toolbar menu to get a new testsuite including an example testplan.
 - The new created testsuite contains the "Master Testplan Rel. 1". Select it.

- Execute the testplan by clicking on the execute button
 . Confirm all dialogs until the testplan execution has been finished. The testplan has to appear like
 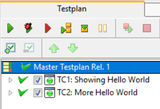 .
.

Click on the Printer-icon in the top toolbar.
A dialog appears, asking for which run's report to print, and your print preferences. You can choose a saved run's log from a previous expecco session, or one of the recent runs of the current session.